Exercise XVIII. A Parquetry Mat
Description
This section is from the book "Manual Instruction: Woodwork. The English Sloyd", by S. Barter. Also available from Amazon: Manual Instruction: Woodwork.
Exercise XVIII. A Parquetry Mat
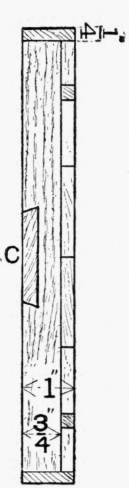
Fig. 230. Dovetailed wedged clamping is introduced in this exercise. The drawing should be the plan of face, and back, and section on a b, as shown.
The foundation must be made from a piece of wood (yellow deal) 9 ins. long by 9 ins. wide and 1 in. thick, and a strip of some hard wood, 2 1/2 ins. wide, for the key, as the wedge is sometimes called, will be required.
The inner diamond-shaped pieces can be made from two strips 9 ins. long by 1 1/2 in. wide and 3/8 in. thick, one of them of walnut or mahogany, and the other of sycamore, plane tree, or some other light-coloured wood. The right-angled triangles which fit between the points of the star should be made from some wood, such as green bass-wood, which will bring the star more prominently into notice. The inner fillet should be made from 2 ft. 7 ins. of some dark wood to match the dark-coloured diamonds, and 3/8 in. square. The next fillet should be made from a strip of 1-in. sycamore 2 ft. 7 ins. long and 3/8 in. thick. The outside fillet, which encloses both the foundation and the parquetry, can be made from 2 ft. 9 ins. by 1 1/4 in. by 3/8 in. of walnut.
Commence work by planing the yellow deal true and then set out the dovetailed groove. The wedge is intended to restrain the wood from warping or twisting, and it is therefore wedged and dovetailed, as will be seen in the section, to keep it in its place despite shrinkage of the deal, and is put in at right angles to the grain of the base.

Plan of top.

Plan of back.
Section on a b.
Fig. 236.
The joint is a good one, but has been withheld before, as it involves sawing across a large surface with the tenon saw in an inclined plane. In marking the wood, set out the width of each end of the wedge in the middle of the opposite sides.
Prepare the key and put it in the groove, but do not glue it in yet. The reason of this is that any shrinkage taking place in the newly planed wood may perhaps cause the wedge to become a little loose, and it can, when the wood is presumed to be finally shrunk, be finally driven tightly in and glued on the heel or wide end of the wedge only; shrinkage in the foundation will then cause the wedge to draw even tighter. Glueing on the opposite end would cause wood to draw off the wedge, and would be fatal to the very object for which the wedge was introduced.
Plane up all the strips for the parquetry - not the outside fillet - to the dimensions. The strips for the star should now be shot on the edge in the shooting board. In doing this let the face side of one strip and the back of the other be upwards, as in Model VI., to obtain good joints and a level surface in the finished work. With the bevel set very accurately at 45°, the diamond-shaped pieces can now be set out as in fig. 237, allowing, as will be seen, a little waste between each piece.
In sawing this strip up into the small rhombuses, great difficulty will be experienced in making them all correct to dimensions on all four sides, unless the following plan is adopted: -
Commence by sawing off the small triangle of waste at the end and shooting the edge of the first rhombus true, before cutting it off, as in fig. 238, which shows the shooting board with the strip of wood in position ready to be planed. Saw off the first rhombus a little full, and shoot the edge of the next one true as before.

Fig. 237.
Now the first rhombus made is a little too long on the sides parallel to the grain, and exactly how much too long, must be ascertained before the pupil can be safe in shooting the rough-sawn edge last made. To do this apply the long edge to the trued-up edge of the strip, as in fig. 239. The very small amount of wood which has to be planed off is now known, and may be removed, care being observed not to take off too much before again testing it. Complete the other rhombuses similarly. When four have been made, their accuracy, or the accuracy of the adjustment of the stop on the shooting board, may be tested by placing them together, with their acute angles meeting in a point. They now give two right angles or a straight line, and a straight-edge placed against them should fit exactly (see fig. 240). The bass-wood strip may now be taken up, and when planed true, but wider than the dimensions, set out, as in fig. 241. Make these right-angled triangles in the same manner as the rhombuses, but, of course, each one will be a little larger than is wanted. Glue up the star on a piece of wood, and after leaving it about ten minutes to set, insert the bass-wood triangles to complete the octagon. One half of fig. 242 shows the shape and the plan of the nails, which are placed all round in pairs at the angles, to keep the joints well up. It will be noticed that the outside corners of the bass-wood triangles have to be cut off to allow of their being jointed. The banding is prepared by glueing the two strips together in the length, with the thin inner strip planed true to dimensions, and the wider strip left a little full. This joint is so long and the wood so light that the glue might fail to hold, unless a few wedged cleats are put on at intervals, as shown in fig. 243.
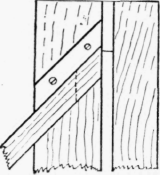
Fig. 238.

Fig. 239.

Fig. 240.

Fig. 241.
The octagonal plate should be taken up, and the edges shot down to the points of the star, and the paper scraped off the back with a saw blade used like a rake, so that the points of the teeth make scored marks. This will effectually remove the paper and leave the surface of the wood rough, which will be of assistance on the glueing down on the deal foundation.

Fig. 242.
The banding should be cut off, as in fig. 244, to the required lengths. These lengths should be marked on the wood after comparison with the face of the octagon, which they are required to fit. The mitred joints should be carefully fitted to each other, and the joints numbered, as in fig. 242, so that they may be glued down in their correct position without risk of confusion.
The deal base may now be planed true, and the octagon and banding glued down. The octagon should be first put down, and be well rubbed to get out the surplus glue. When the glue 'sets,' the banding should be quickly put down piece by piece, again taking care to rub the glue well out. One half of fig. 242 shows the complete octagon glued down, and, as usual, kept well together with nails, driven in close up to the parquetry.
The yellow deal base can now be cut down to the dimensions of the parquetry, and the fillet to go round the outside prepared, cut off in proper lengths, and the mitres shot true. These may be glued on as usual, and then nailed on from the outside with a few small brads.

Fig. 243.

Fig. 244.
The trying plane should be used to bring the surface true, and then the iron-faced smoothing plane should make it smooth. Finally, with a piece of No. 0 glass-paper stretched tightly on a smooth piece of cork, rub the whole surface with a circular movement, but do not destroy the sharp edges.
Continue to:
My Books

