Tailored Waist
Description
This section is from the book "School Sewing Based On Home Problems", by Ida Robinson Burton, Myron G. Burton. Also available from Amazon: School Sewing Based On Home Problems.
Tailored Waist
Materials
Dimity (Chap. I, Par. 15) or Lawn (Chap. I, Par. 23) or Madras (Chap. I, Par. 25) or Percale (Chap. I, Par. 31).
2 1/2 yards of 36" material.
4 buttons.
Thread to correspond with material.
Introductory Statement
The wearing of tailored suits has made the separate blouse a necessity. The style of this separate blouse varies from the beautiful lace, chiffon, net and fancy silk waists to the semi-tailored and the strictly tailored or mannish shirt waists. While the strictly tailored waist is worn with stiff collars and cuffs, it may be modified by changing the shape of the collar and the style of the cuffs into a much more comfortable and becoming garment.
The heavier materials used in making the shirt waist are linen, percale, and similar materials. Lawn, voile, crepe de Chine, China silk, dimity and organdie are some of the thinner materials frequently used.
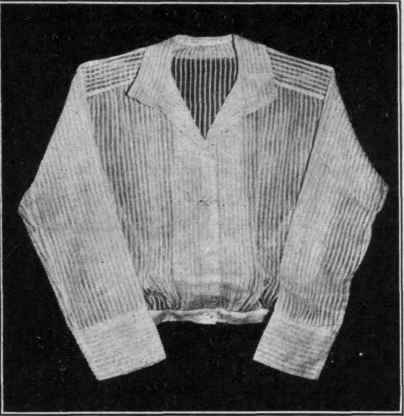
The white dimity waist shown in the illustration is a simple modification of the regular tailored waist. The rolling collar takes the place of the collar band, and the fitted cuffs take the place of the stiffly starched cuffs which are usually fasten with links or cuff buttons.
References:
Principles of Correct Dress, F. H. Winterburn.
The Well Dressed Woman, H. G. Ecob. Fowler & Wells Co.
Working Directions For Tailored Waist
Preparing Material
Shrink the material if cotton goods is used.
Cutting Out The Waist
A commercial pattern may be used for this waist. If it is used, carefully study the guide chart and directions accompanying it. Or, if desired, patterns for the waist and sleeves may be drafted according to the directions given in Chap. IV.
If a drafted pattern is used there is no allowance made on the front pieces for finishing, or lapping; these edges should be finished before the waist is cut out; then the center front of the pattern should be laid on the line where buttons and buttonholes are to be placed. The front edges of the waist shown in this lesson are finished on the wrong side with a facing or hem about 3 1/2" wide, as shown in the illustration.
The front of a shirt waist may be finished on the right-hand side with a hem about 1 1/4" wide, turned to the right side and stitched 1/4" from each edge, if the material is the same on both sides. If the material is different on the wrong side, this edge may be finished with a facing turned to the right side and finished as suggested for the hem. The left-hand edge may be finished with a hem 1/2" or 3/4" wide.
If the waist is to be tucked, it may be tucked before laying on the pattern, then cut out in the same manner as a plain shirt waist.
Joining Seams
A yoke should be fastened to the body of the waist with lapped seams. The sleeves and under-arm seams may be joined with French seams, while the shoulders should be joined with felled or lapped seams. After the waist is basted together it should be tried on and fitted (see suggestions for fitting a waist, Chap. IV). The bottom of the waist is to be finished with a band or peplum, the extra material below the waist line may be trimmed away at this time (be careful not to cut the waist too short). After fitting remove waist, rebaste it if necessary and finish the seams.
Finishing The Neck
With collar as shown in illustration. Cut a doubled strip of material 3" wide at the ends and 2 1/2" wide in the back (cut this collar out of scrap material first and see that it sets properly before you cut it from your waist material). Baste the ends and top edges together, with the center backs even, baste the under side of the collar to the right side of the waist, letting the ends come out exactly even with the front edge of the waist, as in the illustration (the neck curve should be trimmed off the ends of these front pieces). Stitch in place; turn the upper side of the collar over until it covers the stitching. Baste and stitch in place.
With collar band. Sew the two pieces of the collar band together on the top edge; baste the outside edge to the neck as pinned in fitting; turn in and baste the inside edge over the seam formed; keep it just opposite the outside edge. Turn in the ends and stitch all around the collar band.
Cuffs
Cuffs shown in lesson. Cut a strip for each cuff 6 1/2" wide and long enough to allow the hand to slip through easily when the ends are joined. As the cuff is made double, sew one edge onto the bottom of the sleeve, which may be gathered a trifle if necessary. Turn in the raw edge on the opposite side and fold it over to cover the stitching; pin, baste and stitch in place. Sew the ends together with the seam of the sleeve, tapering it off toward the hand.
Tailored Cuffs. Up from the bottom edge, cut an opening 4 1/2" long 1" from the center back of the sleeve. Finish this opening with a bound placket (Chap. II, Par. 161), varying it as follows: Before stitching the second time trim off the inside thickness of the placket to within 1/4" of the edge on the upper side; baste and stitch it flat on the sleeve on the long edge and across the end at the top of the placket opening.
To finish placket on the outside, cut a strip 1 1/2" wide, and 2" longer than the placket opening; make it pointed at one end, turn in the raw edges; make the straight end even with the bottom of the sleeve and one edge even with the upper edge of the placket. Baste and stitch it in place. At the end of the opening make two parallel rows of stitching across the placket.
For the cuffs, cut two strips of material 10" long and 6" wide; cut two strips of heavy cotton material the same length and half the width (for interlining). Baste the piece of interlining to the wrong side of each cuff, making it even on the edges. With the .interlining on the outside, fold the cuff double and stitch the two ends together. Turn right side out and baste around the folded edges. Place the edge of the interlined side on the bottom of the sleeve, making the ends even with the edge of the placket. (If the cuffs are to be lapped, allow the end of the cuff to come to the edge of the extension on the under side of the placket; if they are not to be lapped, but joined with cuff links, turn the extension piece back on the under side of the sleeves and sew it in with the cuff). Baste and stitch the cuff in place, gathering the sleeves into the cuff on the under side, if necessary. Turn in the opposite edge of the cuff; pin, baste and stitch in place on the right side of the sleeve. In the center of each end of the cuff, 1/2" from the edge, work a buttonhole for the cuff link.
Finishing The Bottom Of The Waist
With band. Gather the bottom of the back edge of the waist to . about 10", starting and finishing the gathers 2 1/2 from the underarm seams; gather the lower edge of the front pieces and draw them up enough to make the bottom of the waist fit the band. Sew on the band the same as directed for the tailored cuffs (omitting the interlining of course). The band may be made loose and have a piece of elastic run through it.
With tape. Baste and stitch a tape about 1/2" wide over the gathers at the waist line in the back. Let the bottom of the waist hang loose and extend about 4" below the waist line.
Fastenings
Join the waist in front with buttons and buttonholes worked lengthwise and barred at the ends (Chap. II, Pars. 135-136).

Continue to:
My Books

