Materials Suitable For Infants' Clothing. Continued
Description
This section is from the book "A Manual Of Home-Making", by Martha Van Rensselaer. Also available from Amazon: A Manual of Home-Making.
Materials Suitable For Infants' Clothing. Continued
Designs and materials for garments suitable for girls from ten to twelve years of age.
The washable middy blouse with the cloth skirt (Fig. 105)
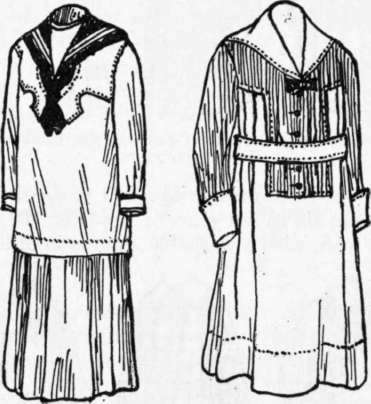
Fig. 105. - Suitable designs for dresses for children from ten to twelve years.
and sateen bloomers is a satisfactory combination for the school frock; or the middy, skirt, and bloomers may be made of the same cotton material. The straight plaited skirt is a good design. The one-piece dress in gingham or galatea is also satisfactory (Fig. 105).
Knit underwaist and drawers or knit union suits have been found by many to be the most satisfactory undergarments for children from three to twelve years of age. The bloomers may be made on a waist or may fasten on the underwaist. The following materials are suitable:
For a middy blouse: middy twill, galatea, poplin, Indian head, khaki, linen, serge.
For a skirt: Any of the materials suggested for a middy blouse, or gabardine, rep, or wool suitings of various kinds.
For a dress: Gingham, chambray, percale, galatea, pique, poplin, cotton gabardine, voile, batiste, and the like.
For bloomers: Any of the materials suggested for a dress or skirt, or sateen-black, white, or colored.

Fig. 106. - Suitable designs for dresses for children from twelve to sixteen years.
Designs and materials for garments suitable for girls from twelve to sixteen years of age.
A middy blouse and skirt or a middy dress may be made of any of the materials suggested for younger girls. The same material may also be used for a wash dress. Suggestive designs are shown in Fig. 106.
A school dress or a street dress of serge, wool poplin, gabardine, whipcord, tweed, or homespun is suitable and practical for a girl of this age.
patching *
Patching is the art of repairing or restoring worn places in garments and household articles. In order to make the patch as inconspicuous and as strong as possible, several things should be observed. All of the worn or torn part should be cut away, making the hole either square or oblong. Sometimes round patches are made, but they are more difficult. If possible, a piece of the material which is as worn or as faded as the garment should be used, thus making it less conspicuous. To fade a piece of new cloth, it should be dampened and laid in the sun. When the material is figured, the pattern in the patch should match that in the garment. If there is a nap, it should run in the same direction on both patch and garment. Warp and woof threads should match also.
There are two kinds of patches, hemmed and overhand, and one must use judgment as to which to use in repairing articles.
Hemmed, or set-on, patch.
The hemmed patch is the stronger and is used on garments and articles which are often laundered or are subjected to hard wear. Hence it is used on household linens, undergarments, and aprons. The directions for making it follow:
(1) Cut a square or oblong patch large enough to cover completely (at least 1 inch beyond) the worn place in the garment. If a sampler is used for practice, make a tear such as might be torn in a garment. (2) After matching the figures, crease from diagonally opposite corners on both garment and patch to obtain the centers. (3) Turn in the edges of the patch to the right side slightly less than 1/4 inch. Crease or baste down. (4) Place the right side of the patch to the under side of the opening with the centers over one another, and the figures in the patch and the garment exactly matched. (5) Baste into position. (6) Hem with fine hemming stitches. (7) Cut away all the torn portion of the garment, making the shape of this opening conform to the shape of the patch, and allowing at least 5/8 inch between the edges of the patch and the opening. (8) Make cuts on the diagonal creases 1/4 inch deep. (9) Turn in the edges slightly less than 1/4 inch, following a thread of the material. If the material is a plaid or a stripe, turn on the edge of a stripe, never through the middle of one. Also the patch will be less conspicuous if the turning is on a dark rather than on a light stripe. (10) Baste into position, using great care to have stripes or figures match exactly. (11) Hem with fine hemming stitches. (12) Remove the bastings, dampen and press.
* Ext. Circ. 14, Coll. of Agr., Univ. of III.
Overhand, or set-in, patch.
The overhand patch is less conspicuous, so it is used more often for outer clothing. It is less serviceable, for it is joined to the opening with only one seam, and the corners are held by a single thread. It is made in the following way:
(1) Cut a square or oblong piece large enough to cover completely the worn place. (2) After matching the pattern, crease from diagonally opposite corners in both garment and patch to obtain the centers. (3) Turn in the edges of the patch 1/4 inch, on the wrong side of the material, turning on the warp and woof threads. (4) Lay the wrong side of the patch to the right side of the garment with centers and figures matched. (5) Baste with short stitches very close to the turned edges. (6) Beginning a little distance from one corner, overhand the edge of the patch to the garment with close, shallow overhanding stitches. Be very careful at the corners not to take the stitches too deep, as this will cause the corners to be puckered, or to catch in the two middle thicknesses. (7) Continue overhanding around the four sides. (8) Remove the basting. (9) On the wrong side, cut diagonally from the center of the hole in the garment to the four extreme corners of the patch. (10) Crease the seams open on the overhanding. (11) Trim the edges until they are parallel to the edges of the patch and 1/4 inch wide. (12) Cut off the corners of the patch diagonally, so that they do not overlap. (13) Overcast separately, with short overcasting stitches, the edges of the seams.
Continue to:
My Books

