A Play-House Or Play-Store
Description
This section is from the book "Woodworking For Beginners: A Manual for Amateurs", by Charles G. Wheeler. Also available from Amazon: Woodworking For Beginners.
A Play-House Or Play-Store
You know that an ordinary wooden building has a framework of timbers, - a kind of skeleton upon which the boarding is nailed. This will be shown in the following chapters, but a very small house or cabin, like that shown in Fig. 363, suitable for a play-house for boys and girls, can be built very well in a simpler way by making the four sides separately and then nailing them together as you would do if making a box. There is no floor (except the ground), and the roof is to be nailed down on top of the four sides as you would nail the cover on the box.
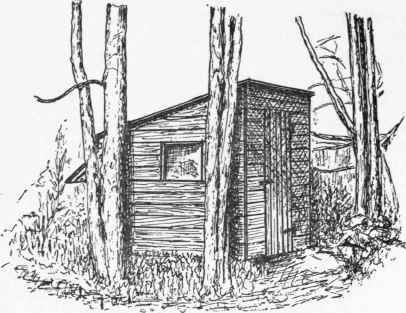
Fig. 363.
A little house, with trees a-row, And, like its master, very low ! - Pope.
Before beginning work read carefully Marking, Rule, Square, Saw, Nailing, in Part V., and look up any other references.
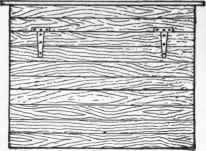
Fig. 365 shows one of the sides (inside view). It is made of boards running horizontally, with an upright cleat at each edge, and another cleat at the top.
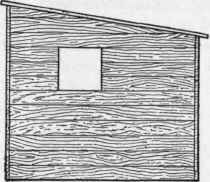
Fig. 366 shows the back (inside view), made in the same way as the sides, except that each cleat is set back from the edge if", thus forming a rabbet in which to fit either side when the house is put together. The third, fourth, fifth, and sixth boards from the top are not nailed to the cleats, but are omitted, to leave space for a large open window.
Front Elevation
Side Elevation
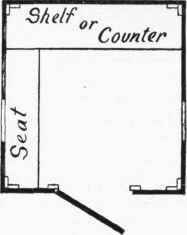
Plan.
Rear Elevation
Fig. 364.
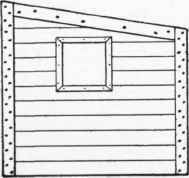
Fig. 365.
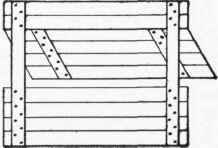
Fig. 366.
Fig. 367 shows the front (inside view), four upright cleats being used and a large opening left for the doorway.
First estimate the stock you will require (see Chapter IV.),1 and try to get dry wood without too many large knots.
You can get along very well for such work as this on the floor, or even the ground, with a couple of boxes for horses, but a bench and horses are a great convenience.
Make the sides first, disregarding the slant for the roof. Take a matched-board and square off one end of it, if it is not already square. Then measure 5' 10 "2 from that end, mark across by the square, and saw the piece off. Use this piece (5' 10' long) as a measure to mark the lengths of enough pieces to make the two sides. If you saw them off as you measure them, one by one, be sure to mark all the lengths by the first piece, and not by the one last sawed, or they will probably vary in length.
When you put the boards together to form the sides, be sure that the ends are in line. Use the edge of a straight board for a straight-edge to get them in line, or drive them against the side of the room, if that is straight, or temporarily nail a straight-edged board to the floor and keep them driven up squarely against it.
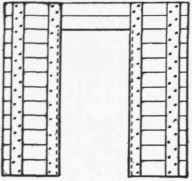
Fig. 367.
1 To find the number of square feet in the cleats, first find the number of "running" feet, that is, the total length of the cleats if they were stretched out in a long line, like one of the rails of a railroad track. Then, as the cleats are 3" wide (or one fourth of a foot), it will take four running feet to make one square foot. Therefore divide the number of running feet by four and the quotient will be the number of square feet.
2 Boards twelve feet long will be the best to buy for this house, because you can get two lengths from each board without waste. You could not be sure, however, of getting two lengths of exactly six feet from each twelve-foot board, because the ends are frequently checked or damaged in some way ; so it will be safest to make the length 5' 10", as given above.
Make sure, also, by testing with the square or by measuring, that each side of the house when made is a rectangle and not a rhomboid, or the whole house will be askew when put together.
When you fit the matched edges be sure to make the joints as tight as you can, but do not pound directly on the tongued and grooved edges with the hammer. Take a short piece of waste boarding, fit it to the tongue or groove wherever you wish to strike, and hit this waste piece with the hammer.
You will see that there is no need of sawing out a square hole for the window, as you can put in short pieces at each side of the window-space.
Nail the upright cleats at the edges with 1 1/2" nails, driving two into each board in the way shown in the cut, bearing in mind that the cleats must all be on the inside of the house, and also to have the tongues of the boards uppermost when the house is put together. Mark the front edge of each side in some way to prevent any mistake. The reason for putting the tongues upward and the grooves downward is because the joints will shed the water better, as otherwise each groove would be a little trough into which the rain could soak. Measure 5' 6" from the bottom on the front edge of each side and 4' 6" on the back edge. Draw a straight line on the outside between these points and it will give the slant for the roof. Saw the boards and cleats by this line and then fit and nail the top cleats as in Fig. 365, or nail the top cleats first and saw the boards off by them.
Next make the back in the same way, setting the cleats 1 3/4" away from the edges. Leave out the boards at the window-space.
Make the shutter, and trim off its tongued and grooved edges (see Paring, etc.) before nailing the back of the house together, as you can thus determine more easily the space to be left open. Also trim off the tongued edge of the board coming next below the shutter. Leave the open space a little wider than the shutter
(say 1/4" wider) to allow for possible swelling of the boards. When you nail the cleats on the drop-shutter, be sure to use nails long enough to clinch (see Nailing), or use screws (see Screws).
The front is to be made in the same way, the width of the door-space being 27 1/2", and of the boarding at each side, 21 1/4". Have the two inner cleats project about an inch inside the edge of the doorway for the door to hit against when shut (Fig. 367), and " toe " or clinch the nails for these cleats, or use a few screws, so that the slamming of the door will not loosen them.
Now the four sides are ready to put together. Find a spot as nearly level as you can for your house. Do not, however, put it in a hollow where the floor will be flooded with water when it rains. Hold up the front and one side in the right position, press them closely together at the corner, and drive in a couple of nails to hold them until you can get the other parts in place. Then fit on the other side and the back in the same way. Try the four corners with the steel square, and when you have them right nail all the corners strongly with 2 1/2" nails. If you have no large square, measure the diagonals with a stick, altering the angles at the corners until the diagonals are equal. Toe the nails at the corners, and, in fact, if you can do it neatly, it will be stronger to toe the nails throughout the work.
Now get out boards 6' long for the roof, to run from side to side. When you nail them on have them project 1" all around. Cover the roof with roofing- or sheathing-paper. Lay it in strips from side to side, beginning at the back and letting the second strip overlap the first, as shingles are laid. Three strips will cover the roof once. Of course you can cover it with as many layers as you wish to pay for. Fasten the paper with roofing nails or tacks. Drive them close together, but only where the strips lap and at the edges of the roof. You can bend the edges of the paper down over the edge of the roof to cover the joint underneath and nail neat strips of wood outside to cover the edges of the paper, or you can simply nail the paper around the edge of the roof.
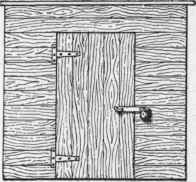
In making the door (Fig. 368) clinch the nails which fasten the cleats, or use screws, and trim off the tongued and grooved edges, as with the drop-shutter.
Now hang the door and drop-shutter with two strap-hinges each. Place the door and shutter exactly in position (shut), and tack them temporarily in place with a few nails, or wedge them. Then carefully placing each hinge so that the pin on which it turns is just in line with the crack between the door and the door-frame, mark points for the screws. Bore holes for the screws and fasten the hinges in place (see Screws).
Put a latch, a catch, or a hasp and padlock on the door, and a hasp or screw-eye and hook on the inside for the shutter. Also fix a brace to hold the shutter when lifted, or you can arrange a rope to pass up from the outside of the shutter and around a pulley to the inside of the house, where it can hang down and be used to hold the shutter up by fastening it round a cleat or a couple of nails.
You can fix a shelf inside under the open window at the back (Fig. 364, Plan), resting on cleats nailed to the sides of the house, and also put in a seat at one or both sides, supporting the middle by a short post or a short piece of board on edge.
A few strips will serve to hold the lights of window-glass in place. The house is now ready to occupy.
Of course you can save a good deal of labour (and lose some experience) at slight expense by having the boards sawed off squarely of the given lengths at a mill,-often where you buy the wood. In this case, remember to make a list of the number of boards of each length to take to the mill.
If you would like to be able to move your house or to take it apart and store it during the winter, you can fasten the four sides and roof together with screws, or hook them together on the inside with stout screw-eyes and hooks. You will find this way in very common use by builders and contractors in the little portable tool-houses, offices, and shops which they take apart and move from place to place.
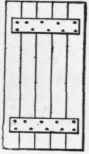
Fig. 368.
Continue to:
My Books

