Box-Making
Description
This section is from the book "Woodworking For Beginners: A Manual for Amateurs", by Charles G. Wheeler. Also available from Amazon: Woodworking For Beginners.
Box-Making
In laying out common boxes, bear in mind that the sides, top, and bottom usually lap over the ends, - the sides over the ends, and the top and bottom over the sides and ends (Fig. 340). Sometimes, however, to avoid joints showing on the front, the front and back are made to lap over the top (Fig. 341), occasionally the ends lap over the back (Fig. 342), and other arrangements are sometimes made. Do not rely on glue for these common square joints in box-work, but place your dependence on nails or screws.
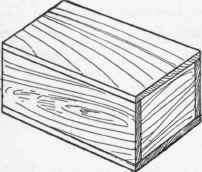
Fig. 340.
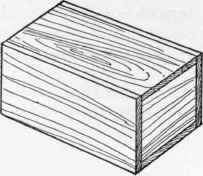
Fig. 341.
Either lid or bottom or both can sometimes project slightly to good advantage (Fig. 343). In nice work, however, the bottom is more often set in so as not to show, either simply fitting in between the sides and ends or into a rabbet (see Rabbet) cut in the lower edge (Fig. 344, showing box bottom up). The lid or cover can be hinged to the top edge of the back of the box, or a narrower lid can be used and hinged to a strip fastened at the back of the box (Fig. 345). Plain lids of this sort, for everything but rough or temporary work, should be cleated, either by end cleats, by framing, or simply by cleats on the under side (see Cleats and Doors).
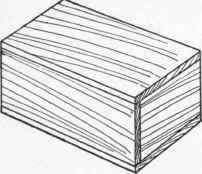
Fig. 342.
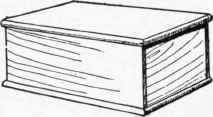
Fig. 343.
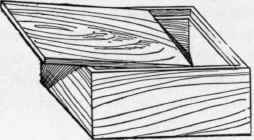
Fig. 344.
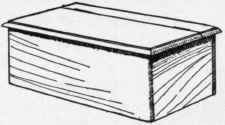
Fig. 345.
Remember that the joints will be held more tightly (for a permanent box) if you " toe " the nails (see Nailing).
Mitring is a common way of making box-joints. It is, however, one of the poorest of all ways in point of strength, and unless done with much skill, - more skill than the average amateur usually acquires, - the joints are very liable to come apart, or at least gape open, and be weaker and look worse than the common, squarely fitted joint first shown.
Glue can be used and is a help. Mitred joints can, however, be strengthened by splines or keys or pieces let into saw-kerfs (see Mitring).
A mitred box is hard for an amateur to put together, particularly when it is to be glued. The whole process should be rehearsed before gluing. Everything must fit exactly before you begin to finally put the box together. If you get one corner out of place, all four will probably be thrown out of position before you get through puttering with them, and the glue become cold and the operation be spoiled. Only a skilful amateur can make a box with nicely fitted mitred joints that will hold permanently.
There are various other ways of making joints by machine (see Joints). The rabbeted joint shown in Fig. 346 can be made by hand very well, but so much quicker with a circular saw that you will save much time by having it done at a mill. It is a good, strong, neat joint and shows less wood at the end than the common way. When it is allowable to round what little end wood there is (Fig. 345) it makes the joint quite inconspicuous. Glue can also be used to advantage with this joint on account of the shoulder.
Dowelling the corners is a method sometimes used. It is easier than mitring, but by no means a strong joint, unless skilfully made. The principal advantage of dowelling is in cases where it is objectionable to have nails show. But, as a rule, there is not much gain in trying to conceal joints. Certainly not unless you can do the work in the best of style. Learn first to make the common, plain joints accurately, and you can then attempt the more difficult ones with some chance of success. The joints can sometimes be reinforced to good advantage by triangular corner-pieces or posts, glued and screwed in place.
There is no better or more workmanlike way of putting boxes together than by some form of dovetailing (see Dovetailing), but this process is hardly one for the beginner to undertake, and should be postponed until he has acquired considerable skill, for, though the principle of laying out and cutting dovetails is easy to understand, much exactness is required in the execution.
Where the box does not open at the top but lower down, as in Fig. 347, the best way is not to make the two parts separately, but simply to put together a tight box and then saw it apart wherever you wish to have it open.
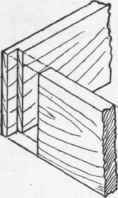
Fig. 346.
Be careful to gauge accurately the line by which to saw it open (see Gauge), and not to drive any nails too near this line. Any which you omit can easily be added after the sawing. Saw the box open very carefully on the line. Smooth the edges after the saw, but take pains not to plane away the wood too hastily, for a very little carelessness will spoil the joint and necessitate a general truing of the edges.
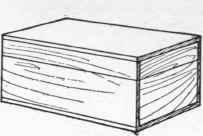
Fig. 347.
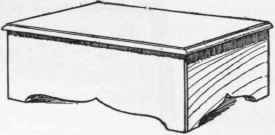
Fig. 348.
A good form for a plain chest is shown in Fig. 348. The construction is the same as in the other cases. The bottom can be fitted to a groove cut around on the inside and can be inserted when the box is put together, or for a rougher job can be simply nailed in place.
A simple form of tool-chest is shown in Fig. 349. This can be made of any size desired and of any wood. It is usually as well to make a good-sized chest, for the cost is but little more than to make a small one. Hard wood will be much more durable than soft. Stock from 3/4" to 7/8" in thickness will be suitable.
Unless you have had considerable experience you had best be content with the simpler joints rather than to attempt dovetailing the corners, as shown in the cut. It is not necessary to cut a rabbet for the bottom, because of the base-board or moulding which is to be nailed around the bottom, and the latter can be nailed or screwed directly to the edge, before the moulding is put around. The rest of the construction of the chest is obvious and like the cases already shown. If the moulding around the lid is to be arranged as shown, it will be best to fit the lock first, as it will be easier to attach the hasp of the lock before the moulding has been added (see Locks and Hinges).
At about two or three inches from the top, fasten a ledge on the inside of the front and back. This can be about 1/4" thick by 1/2" deep and is for the sliding-tray, shown in the cut, to rest upon. This tray can be of soft wood, from 1/4" to 3/8" in thickness, and can be divided as you wish. It will often be advantageous to arrange the lid and the top tray so that tools can be fastened on the inside of the lid. Saws and various flat tools are often thus disposed of, being held in place by straps, blocks, and buttons. You can also arrange a rack around the inside of your chest for such tools as chisels, gouges, etc. When kept in trays, such tools should be separated by divisions. The various details of making such a chest do not differ from those of the articles just described in the preceding chapter on Furniture.
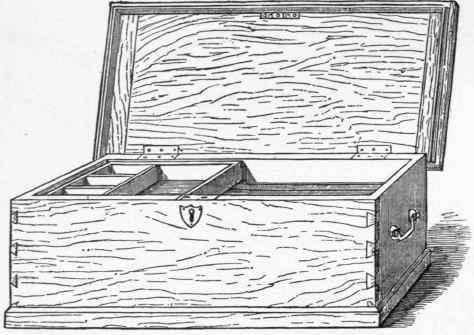
Fig. 349.
In nailing together rough boxes for packing or some temporary purpose, you do not need to devote much thought to the arrangement of the pieces with reference to the direction of the grain, so long as you put them together in a way that your common-sense tells you will be strong. Examination of a few packing-cases will show you all you need to know for such work. But when you make a better grade of box, to be glued, regard must be paid to the direction of the grain and the matter of expansion and contraction. In the majority of boxes and chests the grain of the sides and ends should run in the same way - horizontally or around the box, as shown in the illustrations.
This gives a strong edge all around at the top of the box and permits the use of glue (with some joints) where the sides and ends meet, as the parts glued will thus naturally tend to expand and contract alike. When the grain goes in opposite directions (i. e., at right angles), such joints, unless short, should not be glued. Where the top board is fastened to the sides and ends of the box, as in Fig. 347, it should not be glued, except in the case of a small box, and the grain should run lengthways, so that there will be as little change as possible due to the expansion and contraction (see Chapter IV. on Laying Out the Work, and Appendix).
When several boards are required to cover the top or bottom of a box, if you wish to have as few cracks as possible and to avoid the swelling and shrinking across the grain as much as you can, lay the boards lengthways of the box, but if you merely wish for strength, lay them crossways.
Care must be taken about testing the angles with the square, and guarding against winding (see Winding-sticks), in making nice boxes, as with all framed work. If the bottom and top are got out accurately they will, of course, assist in the matter of getting the box square, and for common work carefully fitting the bottom (or bottom and top) in place will be all the "squaring " required. In nice work where the joints are glued, waste pieces should be placed over the joints (across the grain of the sides) before applying the clamps, not merely to prevent the work being marred by the clamps, but also to distribute the pressure and ensure as close a joint as possible (see Clamps).
The final smoothing of the outside of a box should be done after it is permanently put together, allowing plenty of time, if glue is used in the joints, for it to dry before dressing off the surfaces. The inside must, of course, be smoothed before putting together.
The variety of forms in which boxes are made is too great for all to be specified, but the same general principles apply to nearly all forms of box-work. In the case of chests or large boxes, you will often see them with the sides and ends panelled, but this is rather an elaborate form for the beginner to attempt and had best be avoided by the inexperienced worker. A form which is not too hard for the amateur is shown, however, in Fig. 350, the sides and ends being fitted to grooves or rabbets cut in posts at each corner.
The work of getting out the stock for boxes and making the joints can be done so quickly and accurately (and usually cheaply) by a circular saw or other machine that much time is saved, when making nice boxes, by having the parts sawed at a mill. The remarks made at the end of the introduction to Chapter X (Furniture). (on Furniture), in regard to getting out your work, putting together, smoothing, and finishing, apply equally to making the better class of boxes and chests, and the general details of the work do not differ from those of the articles shown in that chapter. See, also, Marking, Rule, Square, Saw, Plane, Nailing, Nail-set, Screws, Hinges, Locks, Scraper, Sandpaper, and Finishing, in Part V.
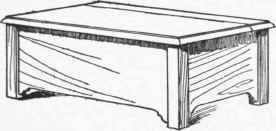
Fig. 350.
Continue to:
My Books

