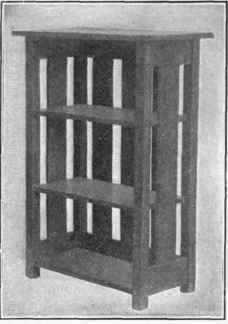
Magazine Rack
Description
This section is from the book "Shop Projects Based On Community Problems", by Myron G. Burton. Also available from Amazon: Shop Projects Based on Community Problems.
Magazine Rack
Materials
Oak (Chap. III., Par. 29), plain or quartered.
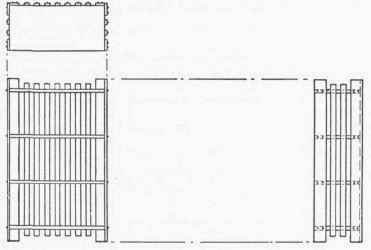
4 pcs. 1 3/4"xl 3/4"x40" S 4 S Corner posts. 2 pcs. 7/8"x8 1/4"x30" S 2 S Top. 2 pcs. 7/8"x4 1/2"x25" Rear cross rails.
4 pes. 7/8"x4 1/2"xl2" Side cross rails.
5 pcs. 1/2"x4 1/4"x33" Panel strips.
6 pes. 7/8"x6 "x25" Shelves. 1 pc. 1/4" dowel 24" long.
7 1 1/2" No. 10 F. H. B. screws.
Introductory Statement
This magazine rack is constructed on principles which would be suitable not only for a magazine or newspaper rack, but for a music cabinet or bookcase. It is very strong and substantial, being assembled with mortise and tenon joints throughout; of course this form of construction will call for very careful and accurate work.
If a closed cabinet is desired instead of the open rack, this plan can easily be modified by making the panels wide enough to fill the space between the corner posts. A panel door could be made to correspond with the remainder of the work and thus a completely closed-in cabinet would be provided.
In the suggestions for original design a very simple idea is presented. A rack made on this plan would be much less work, but it would be neither so artistic nor so substantial as the one presented in the regular lesson.
References:
Library Furniture, in Adventures in Home Making, Shackleton. John
Lane Pub. Co., New York. Furniture for the Craftsman, Paul D. Otter. David Williams Co., New
York.
Magazine Rack

Suggestions For Original Design
Magazine Rack Specifications
The Corner Posts
Although these posts are furnished S 4 S, it will be necessary for you to resurface them with a keen plane, making sure that they are perfectly square. Finish with a sharp steel scraper. Cut them the required length; lay out and cut all mortises for the rails.
The Top
The top is to be made by gluing together two or more boards. These edges must be perfectly planed and joined with dowels. Clamp the boards securely; leave at least twelve hours for the glue to harden.
The Cross Rails
Square the stock for the cross rails; lay out and make them the exact shape shown in the drawing. These rails are to be joined to the corner posts with mortise and tenon joints; in cutting the length be sure to allow for the tenons; lay out and cut all of the tenons to correspond with the mortises in the corner posts. Lay out and cut the mortises for the panel strips.
The Panel Strips
The panel strips are to be fastened into the bottom and top cross rails with mortise and tenon joints, so they will have to be prepared before the other work is assembled. Resurface these pieces and finish with a steel scraper. Make sure that the edges are perfectly square, and that they are all exactly the same size. You will have to exercise great care in cutting the length of the panel pieces so they will make good joints when the work is assembled. They must be long enough to fit snugly between the cross rails when they are assembled. Test them.
The Bottom And Shelves
The bottom and shelves are to be formed by gluing up two or more boards with dowels, in the same manner in which you glued up the top. When the glue is thoroughly hardened remove the clamps, and surface these boards on both sides. Finish with a steel scraper and fine sandpaper.
Assembling
In assembling this work, assemble one side at a time. (Glue all mortises in tenon joints); test all angles frequently with the square. Place the bottom and top rails properly on one of the side panel pieces; then assemble with the two corner posts. In like manner assemble the other side. Glue the three panel pieces into the rear bottom and top rail, then glue these rails into their proper mortises. Note: If you are using the dowel method of fastening the shelves, they will have to be put in at this time. If not, they can be put in after the back is assembled. Clamp securely. If you do not have a sufficient number of clamps to clamp the entire work at one time, it would be well to clamp up one end section and allow the glue to harden, then clamp up another section, allowing it to harden before undertaking the back. The top may be fastened in position by screws put in on an angle on the inside of the side rail (as shown in the preceding lesson), or by short dowels in each post, extending almost through the top piece.
The shelves and bottom are to be fastened in place with small nails driven through the panel pieces; if desired, short dowels may be used in the corner posts.
Finishing
When all the work is properly assembled go over it with a sharp steel scraper, making all surfaces perfectly smooth. Finish with very fine sandpaper. Stain the desired color (it should have a coat of filler; shellac may be substituted). Finish with shellac or varnish.
Optional and Home Projects Employing Similar Principles.
Music Cabinet
1. With very slight modifications this magazine rack may be converted into a very excellent music cabinet. Instead of strips, it should be provided with tight panels. A door should be constructed of similar panel design.
Umbrella Stand
2. The plan of four corner posts with mortise and tenon cross rails may be effectively used in designing an umbrella stand.
Cretonne-Covered Cabinet
3. A very pretty cabinet may be afforded by using this same plan of construction, and lining it on the inside with cretonne. Such a cabinet would be particularly suitable for a sewing room at home.
Continue to:
My Books

