Lesson I. Use Of Hammer. - Nail-Driving. Part 2
Description
This section is from the book "Elementary Woodwork", by George B. Kilbon. Also available from Amazon: Elementary woodwork.
Lesson I. Use Of Hammer. - Nail-Driving. Part 2
Problem III. Driving Cut Hails
Upon another side of the block used in the two last problems, draw lines as before and drive 6d. cut nails. These are wedge-shaped viewed from one side, while of uniform thickness viewed from the adjacent side. Insert them as in Fig. 16, in order that they may not split the wood, which will be the case if they are turned 1/4 the way around.
Follow the order given in Problem I. and drive one row. Follow the order given in Problem II. and draw them without bending. If any nails do become inadvertently or carelessly bent, straighten them on the anvil. Mark as in previous problems.
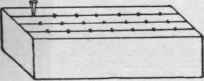
Fig. 16.
Problem IV. Curve-Nailing
Take the block used in the previous problems, draw a line on one side 1/4 in. from the edge, and place points at every inch upon it. On an adjacent side draw a line 1/2 in. from the edge, as in Fig. 17
Provide 1 in. No. 18 steel-wire nails. Using the pliers, bend a nail about 1/8 in. from the point, as in Fig. 18. Insert the nail in one of the prepared points on the first side of the block, with its body standing perpendicular, as in Fig. 19, where an end view of the block is shown.
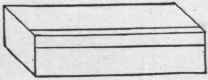
Fig. 17.
Fig. 18.
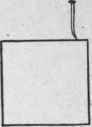
Fig. 19.

Fig. 20.
Drive the nail carefully, causing the point to appear on the 1/2 in. line on the adjacent side of the block, as in Fig. 20. In a similar manner drive nails at the other prepared points, which are on the first side of the block. Mark 10 off from 100 for every nail whose point appears 1/8 in. from the line on the adjacent side.
Problem V. Toe-Nailing
Call attention to the different timbers of a common house-frame, as shown in Fig. 21.
These timbers are largely fastened together by a process called toe-nailing.
Take a piece of soft wood 2 in. X 2 in. X 7/8 in. to represent a sill, and a piece 2 in. X 7/8 in. X 7/8 in. to represent a post or stud. Lay the post on the bench, and with the peen hammer start a 5/8 in. finishing-nail, or patent brad, 1/3 in. from one end, as in Fig. 22, remembering the relation its wedge-shape needs to bear to the grain of the wood.

Fig. 21.

Fig. 22.

Fig. 23.
Press it to an angle of 30° with the side of the post, and drive it well in, but not so as to have the points show on the end. The front view will appear as in Fig. 23. Turn the post so as to bring the bottom side uppermost and supporting it on two blocks, 4 in. X 11/16 in. X 5/16 in., which are to be used in the next problem; start another nail in similar manner, as in Fig. 24.
Hold the post erect on the sill, and joining the outer faces of the two perfectly, drive both brads as far as possible without marring the wood with the hammer. Hold the left hand firmly on the top of the post while doing this, and do not let perfect joining of faces be disturbed. With the brad set and hammer drive the brads till the heads are flush with the side of the post; that is, till the heads have fully entered the wood. The work will appear as in Fig. 25. One nail-head only is shown in this figure, the other being on the invisible side.
In a similar manner start, drive, and set a brad in each of the other sides of the post, when it will be secured to the sill by four brads.

Fig. 24.
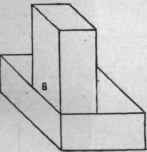
Fig. 25.
Rapid workmen may perform two or even three problems white the slowest workmen are performing one. Mark 10 off from 100 on each problem for every imperfect joining of faces and for every side of the post that is marred by the hammer.
Continue to:
My Books

