A Table Book-Stand (Figs. 8 And 9)
Description
This section is from the book "Handcraft In Wood And Metal", by John Hooper, Alfred J. Shirley. Also available from Amazon: Handcraft In Wood And Metal.
A Table Book-Stand (Figs. 8 And 9)
Object
To show an application of lapped dovetailing to a simple model. Also to introduce simple chamfered moulding, shaping, and inlaying. The length of the model can conveniently range from 11 in. overall size (as per example) to 2 ft. over all size.
The Joints
Mitreing is used for the base moulding; and lapped dovetailing is a variation of through or common dovetailing illustrated on p. 18.
The best angle for dovetailing, either through or lapped, is 1 in 6; the carcase and secret dovetails 1 in 6. The best method of obtaining the correct angle is to draw a line CD in Fig. 8 4 1/2 in. long. Then to divide it into six equal parts; one of these divisions should be drawn at right angles to D and a sliding bevel can then be adjusted. One-eighth the length of D can be substituted for the divisions if desired.
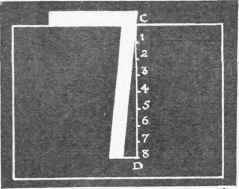
Fig. 8.
Procedure
For the exercise No. 1, Fig. 9:-
1. Plane up pieces to width and thickness.
2. Square one end of each piece.
3. Decide length of dovetail, rather more than two-thirds thickness of socket piece, gauge same on both pieces.
4. Space out dovetails, marking same with the bevel.
5. Cut dovetails, and then fix the thick piece in the bench chop. The end of the thin piece should then be lined up with the gauge mark of the cap, and held firmly in position. This can best be effected by placing the end of the dovetailed piece upon a plane or block. Press firmly down; place saw in cut, and draw forward. A mark will result in each instance. The guide piece can then be removed, and the socket piece reversed, then cuts are made with dovetail saw, leaving the mark upon the wood. Complete by chiselling out sockets and waste, cut shoulders with dovetail saw.
The Process,-1. Plane up to width and length:-
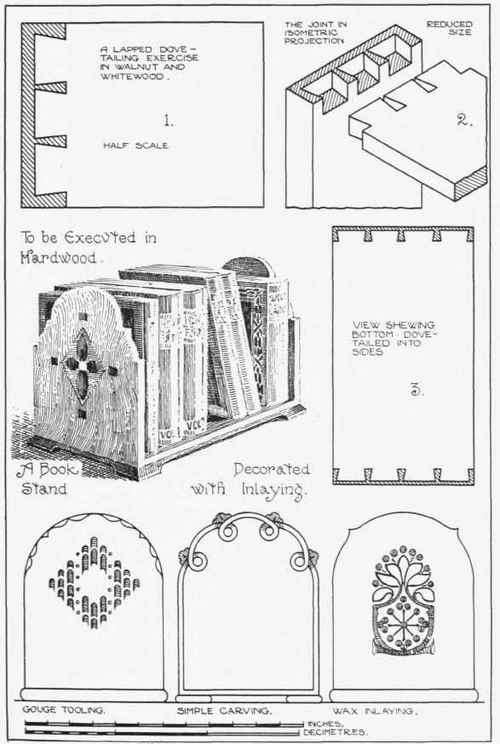
Fig. 9,
Description of Fig. 9 {continued).
English. | Metric. | |||||
2 pieces for Ends | 7 3/4 | X | 6 1/4 in. | 19.5 | X | 15.5 cm. |
2. Saw out and plane up to thickness:- | ||||||
1 piece for Bottom | 11 | X | 6 1/4 in. | 28 | X | 15.5 cm. |
Moulding, 1 length 3 ft. | 2 | X | 2 1/4 in. | 97 | X | 6 cm. |
3. Shoot bottom to length and width, plane ends to width, and square one end.
4. Plane moulding to width and thickness.
5. Dovetail bottom into ends (as per preceding detail).
6. Mark centre lines on ends, draw shape on half, and duplicate with tracing paper and templet.
7. Cut and regulate shapes, paper up same.
8. Set out inlaying as per perspective sketch, or carving, tooling, or stencilled decoration (see bottom diagrams).
9. Sandpaper up all parts; glue together; when dry level off bottom and edges, and mitre round the moulding.
Continue to:
My Books

