Wrought-Iron Candlestick (Fig. 3)
Description
This section is from the book "Handcraft In Wood And Metal", by John Hooper, Alfred J. Shirley. Also available from Amazon: Handcraft In Wood And Metal.
Wrought-Iron Candlestick (Fig. 3)
Object
To embody various processes in a simple model, suitable for a second-year student.
Shows the application of chopping out, filing, drilling, turning, embossing, bending, brazing, screwing, fitting, and riveting. Materials Required.-
7 in. of 1 1/2 in. round iron for pillar.
6 in. of 1 1/4 in. round iron for feet.
5 1/2 x 4 in. of No. 12 I.S.W.G. iron for base.
14 in. of 1/4 in. square steel for spear.
1 1/2 in. of 1 x 3/4 in. for base of spear.
6 x 6 in. of No. 22 I.S.W.G. iron for shield.
2 1/2 in. of 3/8 in. x No. 14 I.S.W.G. iron for clip.
2 1/2 in. of 3/8 in. x No. 14 I.S.W.G. steel for spring.
2 in. of 1/2 x 1/4 in. iron for filling.
3 x 4 1/2 in. of No. 22 I.S.W.G. for save-all.
1 in. of 1/8 in. wire (iron or steel) for taper pin.
2 No. 4 B.A. iron round-headed screws. 1 iron washer 7/16 in. hole.
1. Make thin metal templet of pillar, as shown in Fig. of Hammer Head, f. 6, Ch. VII, p. 80: also half templet of base and shield.
2. Dress up ends of iron for pillar, centre, drill small hole and countersink to fit centres of lathe.
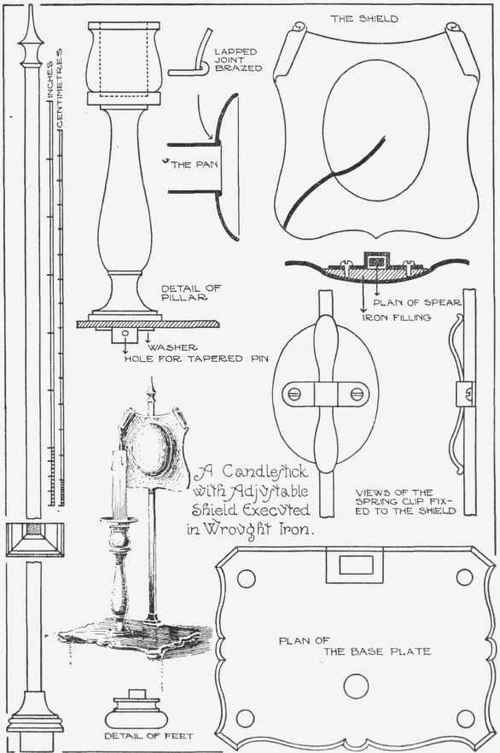
Fig. 3.-A candlestick with adjustable shield reflector.
3. Drill a hole as a guide in one end to the depth required for the socket, then drill a hole 7/8 in. diameter.
4. Put the iron in the lathe and turn to fit the templet. For method of turning iron by hand, see Ch. VII, f. 8. For turning tools, see Ch. xvi, f. 22.
5. Dress up ends of round iron for the feet. Centre, drill small hole, and countersink as before.
6. Turn feet to templet, cutting them nearly off but not quite, then finish cutting them off with hack saw.
7. Mark out base on No. 12 I.S.W.G., using templet. Cut out, file up, and chamfer.
8. Upset and spread end of 1/4 in. square steel for spear head and file to shape.
9. File base of spear out of the piece of 1 x 3/4 in. and fit spear to same, then braze together.
10. Cut shield out of No. 22 I.S.W.G. and trim up edges. Emboss centre and bend up the scrolls.
11. Take the 2 in. of 1/2 x 1/4 in. and fit to hollow of shield, and braze in position.
12. Make spring and clip for pinching spear to shield and fit them.
13. Drill clip with holes to clear screws, drill tapping holes in filling of shield and tap with No. 4 B.A. Taper and plug tap, trying the screws when finished.
14. Make socket of save-all by rolling piece of No. 22 I.S.W.G. iron round a piece of tube or iron rod to fit the socket in pillar, and make simple lap joint and braze together.
15. Emboss pan of save-all. Cut out hole to fit socket just made and roll edge of socket over on to pan and braze from the underside.
16. Mark holes on base plate for feet, spear, and pillar, using templet, filing hole for spear rectangular with a square file.
17. Fit pillar to base plate and washer underneath, then mark hole for pin and drill.
18. Fit feet and rivet them on to base plate, leaving heads semicircular.
19. Put the whole thing together, and see if it looks square and upright.
20. Take apart, clean up thoroughly, dull polish, and lacquer with a colourless lacquer, and put together.
Decoration
The decoration is obtained by forming the outlines of pleasing and simple curves, also by using the construction such as the raised rivet heads on the base to form a decorative feature. The chamfering is also a simple form of decoration as well as the shield, which is based on an Elizabethan example and is ornamented by the scrolled ears and raised centre which was characteristic of that period.
Continue to:
My Books

