Candle Bracket (Fig. 7)
Description
This section is from the book "Handcraft In Wood And Metal", by John Hooper, Alfred J. Shirley. Also available from Amazon: Handcraft In Wood And Metal.
Candle Bracket (Fig. 7)
Object
To show the possibility of combining metal and woodworking processes in one model.
The Joints employed in the woodworking portion are a double mortise and tenon joint, with single ditto on bracket, and secret screwing to secure bracket to shelf. The candle sconce is intended to be screwed down to the bracket.
The Process
1. The model to be drawn on cartridge paper, full size.
2. Saw out and plane to width and thickness:-
English. | Metric. | |||||||||||
1 piece Back | 10 1/2 | X | 4 1/2 | X | 5/8 | in. | 27.5 | X | 14.5 | X | 1.6 | cm. |
1 ,, Bracket | 6 | X | 1 1/2 | X | 1/2 | in. | 15.5 | X | 3.5 | X | 1.3 | cm. |
1 „ Shelf | 6 1/2 | X | 3 1/4 | X | 1/2 | in. | 8 | X | 8.25 | X | 1.3 | cm. |
3. Draw centre line on back. Square across lines for mortise, and mark outline with tracing paper.
4. Set out shoulder and tenons on bracket, cut same, also mortise and tenon in back and fit together.
5. Execute the secret screwing in bracket and shelf (see p. 33).
6. Set out true shape of bracket and shelf, cut same, also the back; spoke-shave, file and glass-paper to line.
7. Execute inlaying as per below, then clean up all surfaces and glue together. Fit sconce and fix.
The Decoration of the example under review is wood inlaying; this can, alternately, be entirely omitted, or simple carving, strapwork, stencilling, or tooling can be substituted. (References to the latter with suitable ideas will be found on opposite page and on p. 144.)
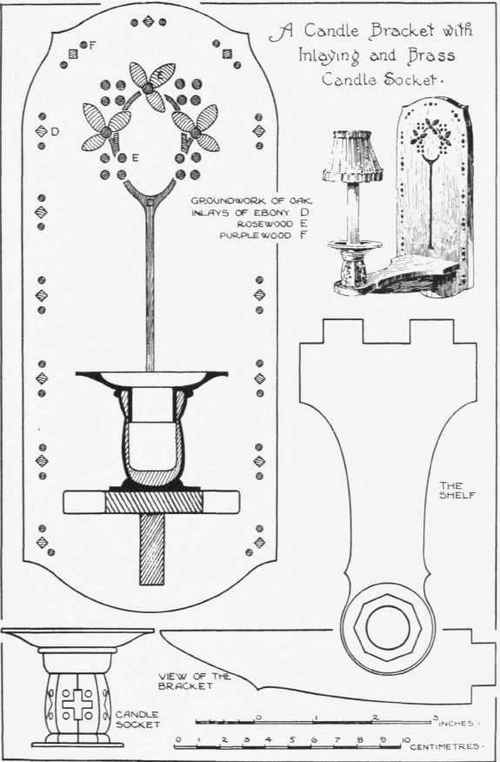
Fig. 7.
Procedure For Inlaying
It is assumed that the ornament is drawn full size on cartridge paper.
1. Trace the pattern on to tracing paper. Gum or paste this down to the back in correct position.
2. Prepare another tracing of the inlay; cut up into small pieces, each containing one unit of the design (or alternately), as described on p. 145. Glue these tracings of units down to veneer, taking care to have the grain running from heel to point of each leaf.
3. Cut leaves and stems with fret saw or gouge, keeping just outside the line.
4. Gouge groundwork, cutting just inside the line; remove cores, and glue units in position.
5. Bore the spot units, and glue in previously prepared sticks.
6. The square units are cut with \ in. chisel.
Continue to:
My Books

