Mirror Or Picture Frames (Figs. 4-6)
Description
This section is from the book "Handcraft In Wood And Metal", by John Hooper, Alfred J. Shirley. Also available from Amazon: Handcraft In Wood And Metal.
Mirror Or Picture Frames (Figs. 4-6)
Tooled, Inlayed, and Stencilled.
Object
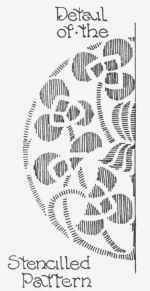
To show applications of a long and short shouldered mortise and tenon joint to a tenoned-up frame. Three shapes are illustrated, embodying similar constructive features. The ornament is varied; the first type shows an arrangement of simple gouge cuts, the second-without shaping-shows a simple inlaid treatment, and the third example illustrates the application of stencilled ornament.
The Joint (see diagram) as an exercise is best cut from two pieces of pine or whitewood 8 x 2 x 7/8 in. These are planed to width and thickness, and then set out as illustrated in Fig. 4, below.
1. Square across lines on stile piece to width of rail AB.
2. Square across rebate line and haunch line CD.
3. Square shoulder lines across on rail piece Ef 1 1/4 in. from end.
4. Return E on face side, F on back side.
5. Set gauge to mortise chisel (1/3rd approx.).
6. Mark mortise on stile and tenons on rails (see dotted lines).
7. Mortise stile, cut tenons, and then fit together.
The Process For Frame (First Example)
1. Saw out, and plane up to width and thickness:-
English. | Metric. | |||||
2 Stiles | 1 ft. 1 | X | 1 3/4 in. | 2 pieces | 33 | cm. |
1 Top rail | 1 ft. 4 | X | 3 1/4 in. | 1 piece | 4. 1 | cm. |
1 Bottom rail | 1 ft. 4 | X | 1 3/4 in. | 1 piece | •4 | cm. |
2. Place stiles together in bench vice and square across sight lines of rails, then haunch and rebate lines, gauge rebate lines on face, edges, and backs.
3. Mark mortise and tenons, cut same, then shoulders, work the rebates with plane (see p. 194, Fig. 10).
4. Firmly secure one stile in bench, then reduce tenon to width; test same in mortise and fit same until both shoulders are tight, and rail lies in the same plane as the stile.
5. Repeat this process with each remaining corner of the frame.
6. Glass-paper inside edges and glue frame together. (Iron stops of bench used for one end, with light iron cramp across the other rail.)
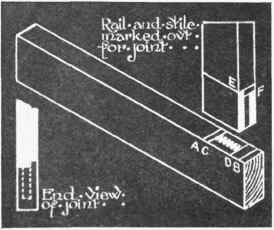
Fig. 4.
Fig. 5.-Frames.
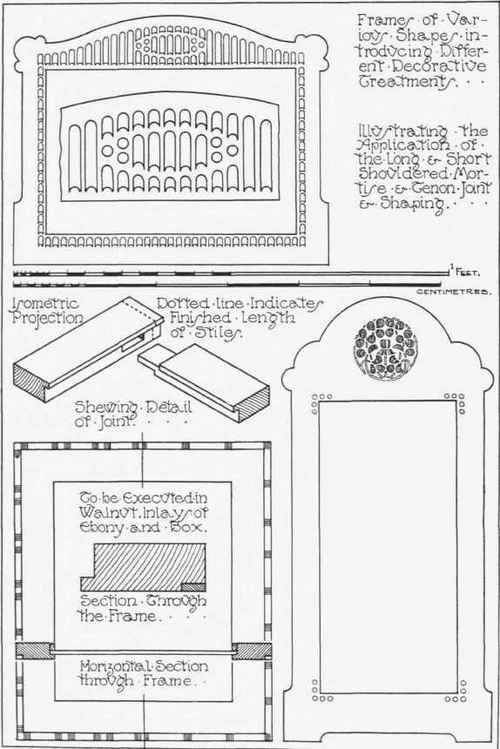
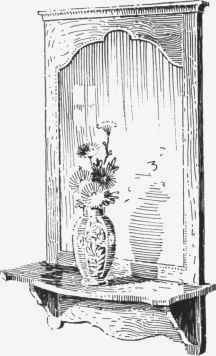
Fig. 6.-A shaving mirror to hang upon a wall. Executed in white-wood and painted.
7. When dry, the frame is planed down level on both sides, and a centre line drawn on face side; the curves are then traced on paper from the full-size drawing and transferred half at a time each side of centre line.
8. Frame is placed in bench vice, shape cut just outside the line with a bow saw, then filed and regulated, viz. freed from lumps and irregularities, and finally papered up.
9. Tooling is spaced out with dividers and drawn upon the wood, then a scribing gouge is used to tool the surface. Papering concludes this part, and the addition of a back from 1/4 in. pine completes the model.
Continue to:
My Books

