Chapter VIII. Third Year Models (Metal). Hammered Dishes Or Paterae And Bowls (Fig. 1)
Description
This section is from the book "Handcraft In Wood And Metal", by John Hooper, Alfred J. Shirley. Also available from Amazon: Handcraft In Wood And Metal.
Chapter VIII. Third Year Models (Metal). Hammered Dishes Or Paterae And Bowls (Fig. 1)
These models can be used for a variety of purposes, the flat dishes for card trays, standing glasses on, etc. ; the simple bowls if tinned or silvered inside make nice sugar bowls, etc. They could be made of brass, gilding metal, copper, aluminium, German silver, or silver.
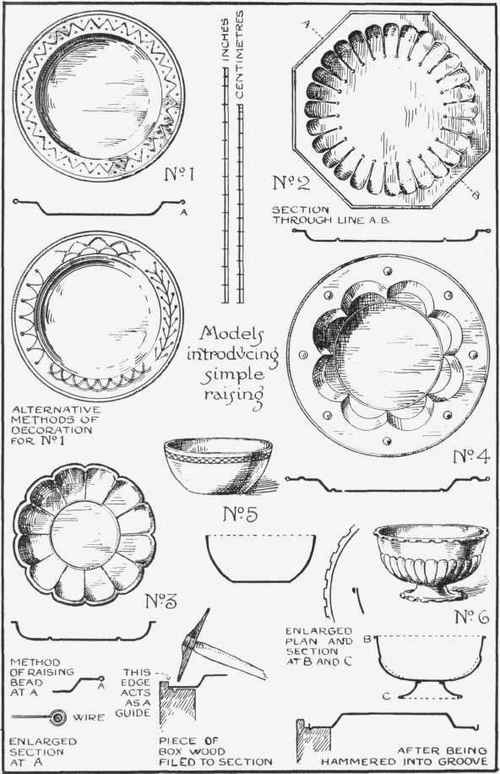
Fig. 1.-Examples of simple raised work.
The Joints
In the plain hammered plates and bowls there are not any joints, as they are worked up from the flat material, but those with a foot have the joints silver soldered, or fixed with very small rivets.
The Method of Procedure for making the dishes or plates (Fig. 1, Nos. 1, 2) :-
1. Make a full-sized drawing.
2. Cut a metal templet to exact shape of raising, depth, and width of rim.
3. Cut the metal out, allowing about 1/4 in. over all extra for Fig. 1, Nos. 1, 2, 3, 4.
4. Cut out a piece of wood like that shown in Fig. 2 and fix to the bench.
5. Fig. 1, Nos. 1, 2, would be raised or hammered up with a double ball-ended hammer on the wood, as shown in Fig. 2. The nails shown act as guides so that if the edge is cut true, the hammered part must be raised true and circular, as you drive the metal down against the edge of the piece of wood a little at a time.
6. After taking one or two courses round the dish you flatten it with a mallet on a flat surface of wood or metal, and anneal it.
7. Repeat operation No. 5 until the plate is of the required depth.
8. Now planish it smooth and true on a round stake with a flat-faced planishing hammer, Ch. xvi, f. 21 (8).
9. The rim is now made flat and the edge trued up, and the plate annealed again.
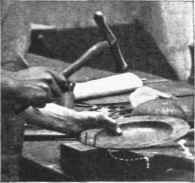
Fig. 2.-Raising a dish on a wood mould.
10. Make up a bed of pitch, consisting of a thick wood base about 2 or 3 in. larger all round than the plate, and mix some common plaster of Paris and tallow with the pitch. The plaster is to harden and toughen, the tallow is to make it flow and soften it. Lay on the board a bed of this about 2 in. thick. Wait until it sets, then prepare some more pitch, pour some on the pitch block, grease the plate, pour some pitch on it, then put it on the block and weight it down, so that the warm pitch is pressed out from underneath the plate; this prevents the formation of air bubbles underneath the metal.
11. Clean the plate on the pitch when cold, and mark out the design.
12. Now trace in the design with the tracers (Ch. xvi, f. 21, Nos. 10 and 11) and the hammer (Ch. XVI, f. 21, No. 9), holding them in the manner shown in
Fig. 3. Plate No. 1, Fig. 1, would only be worked on back, but plates Nos. 2, 3, 4, Fig. 1, would have to be worked up on both sides.
13. After the embossing of plate No. 2, Fig. 1, the edge would be trued up and wired as shown at the bottom of the page, but Nos. 1 and 4, Fig. 1, would, when the centre part was finished, have the edges wired and the designs on the rims embossed last.
14. These would now be cleaned up and polished and lacquered if required.
Fig. I, No. 3.-1. This would be raised up by beating it into a hollow, carved out of a solid piece of wood, usually a piece of a tree trunk, with a ball-headed hammer, then smoothed up and planished on a round stake.
2. Now place it, bottom upwards, on the pitch, clean it, draw the design, and line it in, as described for plates Nos. 1, 2, Fig. 1.
3. Take it off the pitch, clean it, and bed it in the pitch again, the hollow side upwards.
4. Work it up to shape and finish it off.
5. Flatten it, cut out the edge and smooth it up with a half-round smooth file.
6. Clean it up and polish, lacquer it if desired.
Fig. I, No. 4.-This would be made in a different way to the others owing to the design.
1. Draw the design on the metal by cleaning the metal with emery cloth and placing a piece of blue transfer paper between the drawing and the metal, then go over the design with an ivory scriber.
2. Scratch the design on the metal with a steel scriber, working carefully over the existing lines.
3. Lay the metal on a sand bag and work the design up with the punches
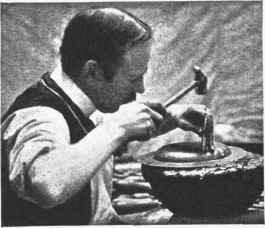
Fig. 3.-Method of holding a chasing tool.
(Ch. xvi, f. 21, Nos. 10, 11, 12, 13, 14), working on both sides of the metal until it is roughly beaten into shape, then anneal it, and repeat.
4. Now place on the pitch, hollow side up, as previously described, and work the bottom down with boxwood punches. The pitch must be slightly warmed for this latter operation.
5. Now take it off the pitch, anneal it, put it on the pitch again, the bottom side up.
6. Work on it with boxwood punches and finally with steel punches.
7. Take it off the pitch, reverse it, and put it on again, always greasing the side that goes on the pitch.
8. Finish off with steel punches making it as smooth as possible.
9. Take it off the pitch, clean it, flatten it, and square up the rim.
10. Wire the edge as shown, that is, trim the edge of the plate true, then file a piece of boxwood to the size required, as drawn, and hammer the metal into the groove with a peining or grooving hammer, then lay the wire in the groove, and hammer the edge down and over it while the bead rests in the grooving tool (Ch. xvi, f. 21, No. 28).
11. Flatten the rim.
12. Lay the plate on a cake of lead and punch the small bosses up with a round punch of the correct size (see Ch. xvi, f. 21, No. 16).
13. Clean up and polish. It could be lacquered if desired.
Fig. I, Bowl No. 5.-This is a little more difficult than the plates, but still comparatively simple.
1. Set out a full-size elevation of the bowl and make a templet of one side and along the bottom to the centre, so that when the templet is laid on the elevation the edge of the templet is on the outside of the line from the top edge to the centre of the bottom. This must be an outside templet, similar to that on p. 80.
2. To obtain the size of the blank required to make this bowl, and as the bowl is part of a sphere, draw a straight line from the extreme outer edge to a point that would be the centre of the half ball if the curved sides were carried round. This would be the radius required. For example, as the bowl drawn is 6 in. in diameter and 2 1/2 in. deep, and we made it into a half circle instead of a flat bottom, it would measure 6 in. in diameter and 3 in. deep, and a line drawn from the centre to the edge would measure 4 1/4 in., so that the diameter of the blank required would be 8 1/2 in. This is the method often adopted for finding the diameters of the blanks required for bowls or segments of circles, but there are many other methods.
3. The blank should now be hollowed up as described for the plate No. 3, Fig. 1, taking care to keep any wrinkles out.
4. Anneal it and hollow it up a bit deeper.
5. Now put a round stake (Ch. xvi, f. 21, No. 26) in the vice, or in a square hole in the hollowing block, and holding the bowl on the stake as shown in Fig. 4, take a course round it, driving the metal away from you and in a downward direction, using a boxwood mallet as illustrated. These courses must be done evenly, gradually working round and round towards the edge, and the same weight of blow being given. The blows must slightly overlap one another, and two should not be given in the same place.
6. The bottom of the bowl should now be flattened on a polished stake (Ch. xvi, f. 21, No. 22) and the edge trimmed off smooth, then annealed, pickled, and dipped up bright.
7. It should now be planished all over on a suitable stake, with the planishing hammer (Ch. xvi, f. 21, No. 8) seeing the hammer and stake are both well polished, and keep the hammer marks very even and do not let the edge of the hammer mark the bowl, as these marks are very difficult to remove.
8. Grease the interior of the bowl, and fill with pitch.
9. When the pitch is set, rest it on a sand bag and draw on the design for the banding, and line it in with a thin tracer (Ch. xvi, f. 21, No. 10). Then warm and remove pitch, and clean with paraffin and sawdust.
10. Polish it with rouge.
11. If required to be tinned, scour the inside with sand and water or emery cloth, paint over the parts that are not wanted to be tinned with whiting, heat the bowl, rub it over with sal ammoniac, pour in some melted tin, swish it round, pour it out again, heat the bowl, and wipe the surplus tin off with some tow dipped in silver sand and powdered sal ammoniac.
Bowl with Foot, No. 6, Fig. I.-This is a little more difficult than No. 5, Fig. 1, and involves silver soldering and brazing.
1. Raise the bowl and the foot as described previously for No. 5, Fig. 1.
2. Fill the bowl with pitch, and when cold draw on the design to be raised.
3. Trace the design in as described for the bowl No. 5, Fig. 1.
4. Remove the pitch, and clean the bowl as described for the bowl No. 5, Fig. 1.
5. Rest the bowl on the sand bag and slightly raise the ornament from the inside with the embossing tools (Ch. xvi, f. 21, Nos. 13, 16).
6. Obtain some half-round material, the same that the bowl is made of. If not, make some from round wire by filing one side flat, or hammering one side flat while the wire is in a grooving tool (Ch. xvi, f. 21, No. 28).
7. Bend it up into a circle and braze the ends together so that it fits on to the bowl tight.
8. Repeat this for the foot.
9. File the notches in the rings as illustrated.
10. Place the rings in their correct position and silver solder them on.
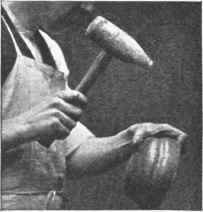
Fig. 4.-Raising a bowl on a stake.
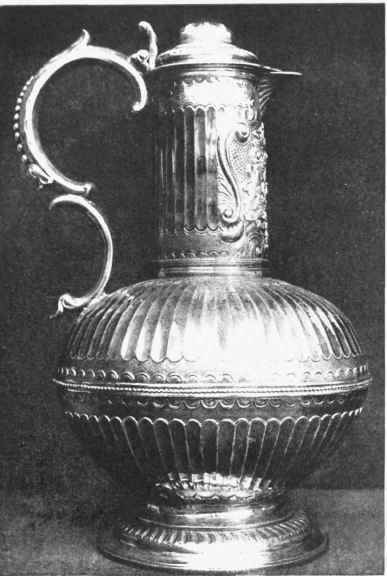
(1) Silver jug, eighteenth century, V. and A. Museum.
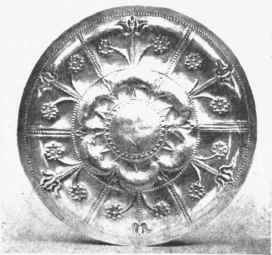
(2) Silver dish chased and repousse, V. and A. Museum, English, 1650.
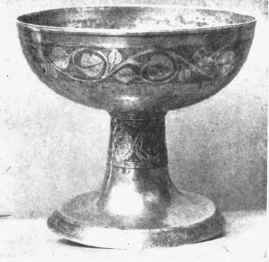
(3) Silver "mazer "cup, second half fourteenth century, V. and A. Museum, lent by J. C. Robinson.
Fig. 5.
11. Pickle, dip, and clean the bowl up all over.
12. Polish with rouge, and tin or silver the inside as required.
Continue to:
My Books

