Pin And Pen Trays (Fig. 6)
Description
This section is from the book "Handcraft In Wood And Metal", by John Hooper, Alfred J. Shirley. Also available from Amazon: Handcraft In Wood And Metal.
Pin And Pen Trays (Fig. 6)
Note
Nos. 1 and 2, and the perspective sketch on p. 17, illustrate a pen tray, to be executed in American whitewood, and designed in order to introduce sawing, planing, and gouging. No. 3 is the sectional view of a more advanced type, involving the addition of bevelling and a thin moulded base. A cavetto or hollow moulding is a suitable alternative detail for this model. No. 4 is a further development of the above types. Mahogany is suggested for the pen tray proper with ebony feet. A mosaic edging should be worked round the top edges, which is further illustrated and described on p. 146. Satin wood and ebony is a suitable colour combination when mahogany is used for the groundwork. Nos. 5 and 6 illustrate an alternative model for the first year, introducing processes similar to the first example. The further development of this type could proceed upon the lines indicated above in connexion with the pen tray.
Material required for the four models (cutting sizes):-
Nos. 1 and 2: | English. | Metric. | ||||||||
1 piece American whitewood, | 10 1/2 | X | 2 1/2 | X | 7/8 in. | 26.6 | X | 6.4 | X | 2.25 cm. |
No. 3: | ||||||||||
1 piece American whitewood, | 10 1/2 | X | 2 1/2 | X | 7/8 in. | 26.6 | X | 6.4 | X | 2.25 cm. |
1 piece „ „ | 11 | X | 2 7/8 | X | 1/4 in. | 28 | X | 7.3 | X | .6 cm. |
No. 4: | ||||||||||
1 piece American whitewood | 4 1/2 | X | 3 1/4 | X | 7/8 in. | 11.4 | X | 8.2 | X | 2.25 cm. |
Nos. 5 and 6: | ||||||||||
1 piece Cuba mahogany | 10 1/2 | X | 2 1/2 | X | 7/8 in. | 26.6 | X | 6.4 | X | 2.25 cm. |
1 piece Ebony | 41/2 | X | 1 1/4 | X | 1/4 in. | 11.4 | X | 3.2 | X | 6 cm. |
The Process (for pen tray. Nos. 1 and 2).
1. Saw out, and plane material to finished thickness, length, and width.
2. Square across pencil lines corresponding to semicircle centres.
3. Describe the semicircles as shown in No. 1.
4. Prepare a 1/8 in. cardboard templet as shown in No. 2.
5. Gouge away the centre part, testing frequently with templet.
6. Finish inside with glass paper, plane and finish the round edges. Process (for pin tray. Nos. 5 and 6).
1. Saw out, and plane material to finished thickness, length, and width.
2. Draw centre lines on face side, mark axes of ellipse.
3. Prepare a paper trammel and describe ellipse.
4. Gouge away the inside part and finish with glass paper.
5. Round edges and finish.
The use of glass paper in connexion with the above models may in the first year be considered undesirable and omitted.
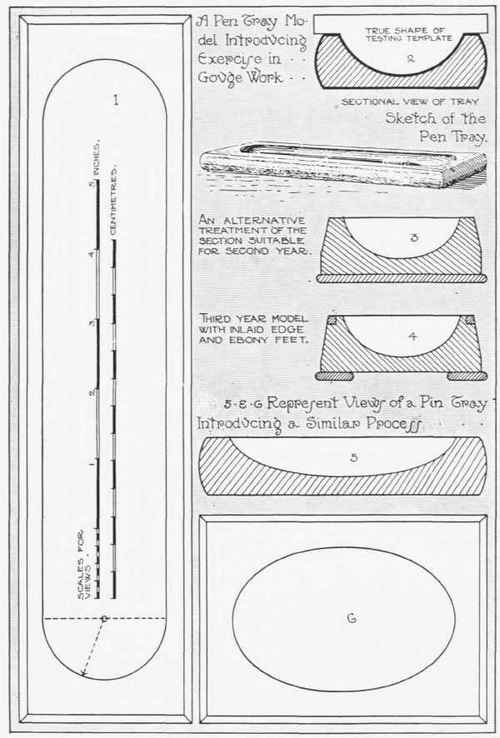
Fig. 6.
Continue to:
My Books

