Watch Stand (Fig. 5)
Description
This section is from the book "Handcraft In Wood And Metal", by John Hooper, Alfred J. Shirley. Also available from Amazon: Handcraft In Wood And Metal.
Watch Stand (Fig. 5)
Object
A model to introduce simple sawing, planing, chiselling, and filing (if curve of back is considered undesirable a straight line can be substituted), also as an exercise in stencilling.
Material.- | Eniglish. | Metric. | ||||||||
1 piece American whitewood, | 8 1/4 | X | 3 5/8 | X | 1/2in. | 20.3 | X | 9.1 | X | 1 cm. |
1 piece ,, „ | 3 3/4 | X | 23/4 | X | 1/2in. | 9.5 | X | 7 | X | 1 cm. |
The Process
1. Saw out and smooth up material as above.
2. Plane one edge of front, gauge, and plane to width.
3. Mark out semicircular head of front piece.
4. Mark bevel at bottom, cut same with dovetail saw.
5. Set out the support as per Fig. 5.
6. Cut head to shape, removing corners with saw; pare away to line with firmer chisel.
7. Cut straight back with dovetail saw, finish bottom with gouge.
8. Nail together, holding back in bench vice.
The Decoration, as illustrated, is simple stencilling; the design should be executed on stiff cartridge paper, then cut out with a sharp penknife. The paper is then placed upon the front and held perfectly flat whilst the colour is dabbed upon it with a brush.
Notes
For class work, simple vee tooling could be substituted for the stencilled design. Painting the whole stand would improve the model; dark green with white or red stencilling are suitable treatments.
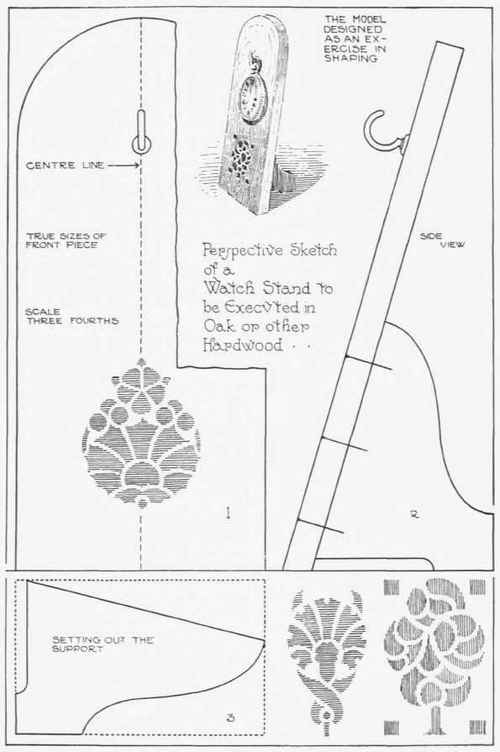
Fig. 5.
A simple geometrical arrangement of spots is also effective, this could be done by boring 3/16 in. holes about 1/8 in. deep, filling in with coloured wax. (This process is further described on pp. 148, 150.)
Continue to:
My Books

