For Wood
Description
This section is from the book "Spons' Mechanics' Own Book: A Manual For Handicraftsmen And Amateurs", by Edward Spon. Also available from Amazon: Spons' Mechanics' Own Book.
For Wood
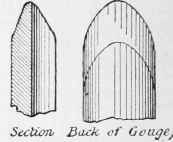
The chief tools usually required for wood turnery are plain gouges and chisels. An inch gouge, that is, one 1 in. wide, is the largest that can well be used with a light treadle lathe, and to use that effectively means hard leg work; 1/2 in., 3/8 in., or 1/4 in. will be more generally useful. The gouges should be well rounded in grinding, Fig. 1266, so that the point, and not the corners, shall be used for cutting, and they, in common with most of the other tools, should be furnished with long handles - of which more presently.
In turning straight stuff, either between centres or on the face-plate, the gouge may be held flat on its back without any danger of its catching in the wood; but, in turning mouldings and in boring holes with the cup-chuck, the tool must be held sideways, and the corner of the gouge which is lowest, or rather, speaking more correctly, some portion of that half of the gouge which is lowest, is the one that will be used for cutting, the higher corner being carefully kept away from the revolving wood to prevent a catch. Even, however, in rapidly roughing down plain wood surfaces, it is advantageous to handle the gouge in this fashion, using both sides alternately, since it cuts the wood quicker, cleaner, and with less friction than when used on the flat. Many amateurs become disheartened in their first attempts at turning, because of the difficulty [of guiding and controlling the gouge. This is a lesson only to be learned by practice. The great thing is to "feel" the work. Thus, if turning down a moulding or, say, the ball on the end of a curtain pole, from circumference towards centre, there is the centrifugal force very sensibly tending to thrust the gouge outwards, and this, of course, is the force which must be resisted.
The point of the gouge, or a portion just below the point, will be used, as offering least friction, and it must be grasped very firmly. In turning a flat surface, no such force exists, and the gouge may be held indifferently in any position and comparatively slack. Always the end of the gouge handle is held in the right hand, while the 3 last fingers of the left grasp the lower portion of the gouge itself. The requisite guidance is imparted to the tool by the thumb of the left hand, while the opposite forefinger passes underneath the rest, in opposition to the thumb, thus gripping the tool as in a vice (Fig. 1284). Lastly, keep the rest close to the work. If you have a wide space, you get too much leverage on the overhanging portion of the tool, and may catch and break your tool. The big gouges are stout enough to stand rough work safely; but the 1/4-in. gouge is a more delicate tool, and should not be used at all for roughing down stuff in the lathe, except it be of small diameter. These remarks may appear slight, but they really embody about all that can be said on the subject.
Let the young aspirant bear in mind each direction, down to the very minutest, and he will find, when by much practice he has gained expertness in the use of the gouge, that all essential hints have been comprised in these few words.
Shopkeepers are always ready to "warrant" the tools of a respectable manufacturer - that is, if found useless on trial, they engage to exchange them, sending the bad articles back to the manufacturer. But sometimes, in the case of broken tools, they will dispute the justice of the claim made by the purchaser. The tool may have been broken by the purchaser's carelessness, and the only way in which the latter can prove his claim to have the article exchanged is by showing the presence of a flaw in the broken part. If, when the tool breaks, a dark spot (Fig. 1267) is seen to occupy a portion of the line of fracture, that is a "flaw," or crack, and is quite sufficient to account for the breakage, and to condemn the tool. The dark spot is simply the film of rust which has formed over the old line of fracture. It should be taken hack while the new fracture is fresh and clean, and easily distinguishable from the old.
A gouge for soft wood is generally ground at a long angle, similar to that shown in Fig. 1268; for hard wood it may be a trifle less. But practically the same gouges are used indiscriminately for both woods, and the angle is always being rendered more obtuse by the process of sharpening. When newly ground the angle in the figure will be a good one.

For side chisels we may select a large one, 1 in. or 1 1/4 in., and a 1/2-in. and 1/4-in. A beginning may be made with one gouge and one chisel, say a 1/2-in. in each case, the others being added as required.
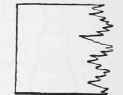
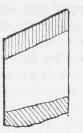
Grind the chisels to an angle of about 20° (Fig. 1269). It should not be less - else they are liable to kick, and they should be kept thin and sharp (Fig. 1270), for cutting down end grain with facility. If thick (Fig. 1271), they "wobble" when cutting down across grain, with the result of leaving the work uneven (Fig. 1272).
In grinding, some impart a slight amount of rounding to the cutting edge (Fig. 1273). When turning, cut near the obtuse-angled end (Fig. 1271), for if you get near to the opposite end, and slacken your grasp for a moment, the acute-angled corner will surely catch, and produce woful consequences. It is well to practise this side turning in preference to scraping, because the oblique cut is more like the action of a plane, and leaves the surface of the wood cleaner than does the tearing action of the scraping chisel. Yet 2 or 3 firmer chisels, say 1 1/2 in., 3/4 in., and 3/8 in., for truing up wooden face-chucks, and pieces of work of large diameter, and for recessing grooves, may be added with advantage.
Fig. 1275 shows a round-nosed tool, necessary in many instances where mouldings have to be finished, and indispensable also to the pattern-maker; 3/4 in., 1/2 in., and | in. will be useful sizes. Of course these can only be used as scraping tools.
Side tools (Figs. 1276 and 1277) and diamond points, or parting tools (Fig. 1278), are for turning, or rather finishing, the internal portions of rings (Fig. 1279) or edges (Fig. 12S0), either inner or outer, which could not be got at by tools having less bevel. These, as well as the round-nosed tools, can be purchased; but they can be readily made, and will be quite as serviceable as the purchased ones, from worn-out fine-cut flat files of different sizes. Grind off the greater portion of the cuts from their faces, and grind also the points to the required bevel or curve, as the case may be, and these will make excellent turning tools. You will be able to afford a greater variety by this means than if every tool had to be purchased. Always manage to utilize the old files in some way or another. Scrapers, screw-drivers, and metal-turning tools, can be made from old files.
When purchased, tools are without handles, and though the ironmonger will supply you with the latter at about 2c?. each, they may just as well be made as bought. Get some hard wood, almost any common wood, oak, ash, beech, birch, apple tree, etc, and saw into strips, some 11 in. or 12 in. long by 1 1/2 in. sq. for the gouges and chisels, and others 8 in. or 9 in. long by 1 1/2 in. sq. for the scraping tools. Chop off the edges, start centres in ends with a gimlet, and run a cut in at one end with a tenon saw for the fork chuck. Get some brass tubing, 1/2-in., 5/8-in., 3/4-in. for different-sized tools, and cut off in lengths for ferruling. The neatest way to cut it off is this: - Say it is 1/2-in. tubing. Get a piece of hard wood, not too long, say 5 in. or 6 in., and turn down to 1/2 in., so that the tubing can be driven tighly over it by tapping with the hammer. When thus driven on, re-chuck the wood in the lathe, and cut off the ferrules with the point of a side chisel, or of a diamond point (Fig. 1281). Tap out the wooden mandrel, file the burr from the inside of the ferrules, after which they are ready to go on their handles Turn down one end of the wood intended for the handle - that end nearest the poppet - with callipers set to the inside diameter of the ferrule (Fig. 1282), and drive the wood into the ferrule tight, opening the jaws of the vice wide enough for the edges of the ferrule to rest upon while doing so.
Then replace in lathe and turn to shape, which may he either that of Fig. 12S3 or that of Fig. 1266, the latter being preferable, as affording a larger grip for the hand. Bore the hole for the tool either with a gimlet or brace and bit, as straight as may be, sighting down gimlet and handle from time to time while boring. Open the hole out at the top with a taper shell bit, until the tool will drop in to within 3/4 in. or 1 in. of its proper position, when the handle must be driven on over the shank with a hammer or mallet, holding the tool in a vice or against a block of hard wood while doing so. A couple of coats of shellac varnish given to the handles will improve their appearance and keep them clean.


Turning tools lose their edges very rapidly, and a quick fretting stone should be used for restoring them. A Charnley Forest stone is hardly coarse enough for turning gouges. It may be used for the chisels, which require a finer edge; but for gouges a Grecian or a Washita stone is quicker in its action, or, even a piece of common slate will serve the purpose. Another reason why a special stone should be kept for the gouges is that they rapidly groove it out, and so render it useless for chisels and other tools having straight cutting edges. A slip of Charnley Forest will do for fretting the hollow portion of the gouge. Even that is not necessary when the tool is roughing down, since the revolving wood itself will knock off immediately the "burr" or "wire edge," which has been produced by sharpening the bevelled face.
Those requiring a more comprehensive treatise on turning cannot do better than refer to Campin.
Continue to:
My Books

