How To Mark A Garment For Basting
Description
This section is from the book "A Manual Of Home-Making", by Martha Van Rensselaer. Also available from Amazon: A Manual of Home-Making.
How To Mark A Garment For Basting
After the pattern is placed, the seam allowance and other necessary points should be marked by one of the suggested methods. The points or lines generally marked are: (1) waist line; (2) seams along the edge of a modeled pattern, or along the indicated line on a commercial skirt or waist pattern; (3) neck-line; (4) armhole; (5) center front of waist and skirt; (6) center back of waist and skirt; (7) waistline of skirt; (8) hip-line; (9) hem-line; (10) lengthwise center of sleeve; (11) points indicating decorations, plaits, tucks, and gathers; and (12) notches.
The notches for the joining of seams should be indicated by a tack of thread or a chalk mark, never by cutting the notch, since this often ruins the final finish of a seam and does not allow for an increase in the size of the garment, if this is necessary.

Fig. 69. - Method used in modeling garments over a flat pattern. A, the paper pattern is pinned together at the shoulder seam and the lines marked showing the design to be followed; B, the resulting waist designed on the original pattern.

Fig. 70. - Adjusting pattern to fit shoulders. A, Alteration necessary for very square shoulders. It is often necessary to fit in the shoulder seam at the base of the neck. This seam should slope very gradually into the old shoulder seam at the tip of the shoulder. This adjustment often necessitates the lowering of the neck-line in both the back and the front. B, Alteration necessary for very sloping shoulder. It is necessary to take in the shoulder seam slightly at the tip of the shoulder near the armhole. The new seam should slope very gradually to the old shoulder seam at the base of the neck. This alteration necessitates lowering the armhole.
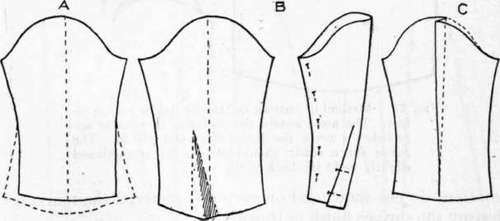
Fig. 71. - Simple adjustment of sleeve pattern. A, Method of increasing a sleeve pattern at the bottom. B, Method of adjusting a shirt-waist sleeve pattern to make a close-fitting sleeve at the bottom without changing the size at the top. A dart may be folded in the under side of the sleeve, taking out the excess fullness. This dart should extend from the bottom of the sleeve about to the elbow. The dart should fall nearer to the outside line of the sleeve than to the seam. C, Method of decreasing the fullness in a sleeve. To take fullness out of the top of a sleeve, fold a plait at the top along the center line, and let this plait decrease to nothing as it approaches the bottom of the sleeve.
The tracing wheel marks two thicknesses of material at once and is, therefore, a great convenience. It cannot be used on all kinds of material, however, for on very thick material the perforations do not show, and on very soft material the markings destroy the surface finish or threads.
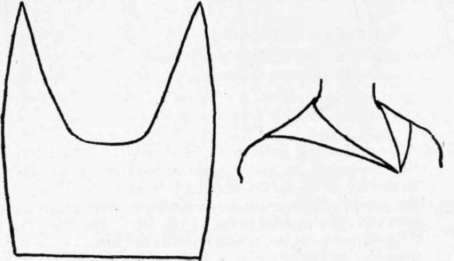
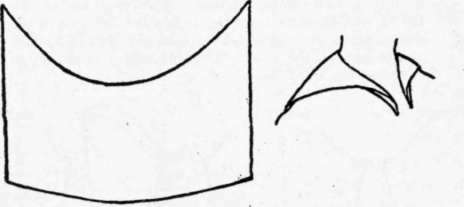
Fig. 72. - Method of cutting collars for flat or rolling effect. The more nearly the neck-line of a collar approaches a circle, the flatter the collar will lie. The curve for a collar should always be straightened slightly to fit the back of the neck.
Tailor's chalk may be bought at the notion counter of any dry goods store. The chalk marks only one surface at a time, and the marks may become obliterated before time to use them. On some materials they are very difficult to erase.
Tailor's basting is a very satisfactory way of marking materials. It requires more time than the other methods, but is more lasting and may be done through two thicknesses. A long double thread is taken to make this tacking. Along the line which is to be marked, even basting stitches should be taken, leaving a generous loop of thread between each stitch. The pattern should be folded back when one is marking lines indicated by perforations in the pattern. The two edges of the material should be separated and the threads cut halfway between the edges. This leaves a marking line of stitches and ends along both edges of the material.
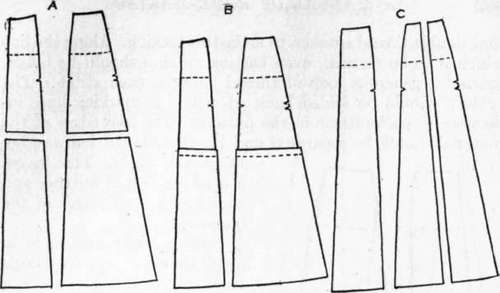
Fig. 73. - Changing length or width of skirt pattern. A, Method of lengthening. The pattern may be cut at a point about opposite the knee, and spread as desired. B, Method of shortening. The tuck may be taken in a pattern about opposite the knee. If the pattern is simply folded up at the bottom to shorten it, a great deal of fullness is removed. C, Method of increasing the width of a skirt pattern.

Fig. 74. - Increasing waist or hip size of a skirt pattern. A, Method of increasing the size of the waist and the hips of a gored skirt pattern. B, Method of increasing the size of the waist without increasing the size of the hips. C, Method of increasing the size of the hips without increasing the waist size.
Tailor's tacks are made in much the same way as tailor's basting. At a point where a mark is desired, a stitch about 1/4 inch long is taken leaving an end of thread. Over this stitch another stitch should be taken leaving a loop of thread. The thread is then cut from the material leaving another end. The two pieces of material are separated, and the joining threads cut, leaving a mark on each piece.
Continue to:
My Books

