Level And Plumb
Description
This section is from the book "Woodworking For Beginners: A Manual for Amateurs", by Charles G. Wheeler. Also available from Amazon: Woodworking For Beginners.
Level And Plumb
Before beginning work read carefully Marking, Rule, Square, Gauge, Saw, and Plane, in Part V. To make a plumb like Fig. 130, take a piece of straight wood from 3" to 5" wide and 4' or 5' long with the edges straight and parallel. Gauge a line down the middle of the side, exactly parallel to the edges, and cut the notch shown at the bottom. Make a saw-kerf at the upper end of the line and another beside it in which to catch the end of the line, or fasten the line around a nail. (See Plumb)

Fig. 130.

Fig. 131.
To make the level shown in Fig. 131, it is essential that the bottom board c d be straight on the lower edge. The two braces a c and a d should be of the same length. The strut a b should be nailed across at the middle of c d and at right angles to it. The essential thing is to have the line a b exactly at right angles to c d, the object of the braces a c and a d being to stiffen the board c d, and to keep the lines a b and c d at right angles to each other. The plumb-line is hung and used as in the case just given, the board c d being used for horizontal work. (See Level)
Cabinets, etc., for Tools and Supplies. - A tool-chest, though a very convenient (and in fact necessary) thing for a workman who is moving around from place to place or who needs a safe receptacle in which to lock his tools in a factory, is not at all necessary in a private shop, nor half as convenient as to have the tools where they can be more readily reached. It is quite a piece of work to make a good one, and it will be better to defer such a job until you feel the need.
An old case of drawers, or bureau, or cupboard, or some such receptacle, if you can find one, will be useful in your shop. A bureau, in fact, makes a good tool-cabinet or substitute for a tool-chest, but if you keep tools in drawers make compartments, trays, or divisions, else the edge-tools may be damaged, not to speak of the inevitable confusion.
You do not need a tool-cabinet for half a dozen tools, but when they begin to accumulate it is a good thing to have and a good thing to make, if there is occasion to keep your tools locked up or if you have limited room. Otherwise it is just as well to keep the common tools as already shown. A cabinet is fully as useful for miscellaneous articles like brads, hinges, etc., as for tools.
Before beginning work read carefully Marking, Rule, Square, Saw, Plane, Nailing, and Screws, and look up any other references.
Perhaps you can find a good box, wide and shallow, all made, or if deep you can saw off part to make it shallow (Fig. 132). This will answer perfectly for a shop. For the house you would of course make a cupboard of new wood. The size must depend on circumstances. Get two boards for doors that will just cover the open side of the box, unless the box cover will do, which is unlikely. If the edges are not good you must allow extra width for jointing. Lay these boards in position and mark the lengths (on the side next the box) by the box itself, not with the 7 square, for the box may not be square. From the lines just made mark the edges with the square, and, with the straightedge, connect these edge marks by lines on the face sides. Saw off by these lines. Mark the box and each door in some way (Fig. 133), as "top," and "R " (for right) and " L " (for left), or by marks, as X, O, 8, etc., to prevent finally putting them on wrong side out or wrong end up, as is very likely to happen if you neglect to mark them.

Fig. 132.
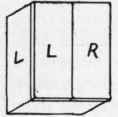
Fig. 133.
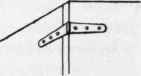
Fig. 134.

Fig. 135.
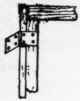
Fig. 136.
Now for hinges. The best thing, on account of the weight to be hung on the doors and the poor quality of the wood generally used for boxes, will be iron strap-hinges made for work of this sort, screwed on the outside (Fig. 134). Two will do for each door. Next to this come the common iron hinges. If the sides of the box are thick and firm, three of the common long and narrow kind (Fig. 135) will do for each door. If the sides are thin and flimsy, nail or screw a strip inside of each edge and use wider and shorter hinges (Fig. 136). To fit the hinges, see Hinges. The doors being hung, take them off while fitting up the case. Gauge a pencil line around the outer edge and each end of the inside surface of each door, where it fits against the edge of the box, as a limit beyond which racks or tools must not project or the door will not shut (Fig. 137).
The fitting up of the cupboard must depend on its size and what and how many tools or supplies are to be kept in it. Shelves you can simply make of the right size and nail into place from the outside, using the rule and square to get them in the right positions. The illustrations are merely suggestions which you can alter or improve upon to suit your particular case. Fig. 138 shows another form, and Fig. 139 a small cabinet with one door, with suggestions for the arrangement of the tools, but the matter of fitting up you must, of course, contrive for yourselves, according to the circumstances. Do not attempt to put full-width drawers into these wide, shallow cabinets, as is often done. It takes an expert to fit drawers that are wide and short (from front to back) and they are not always satisfactory even then. If you wish drawers, either put in a row of narrow ones, or use the simple device described below (Figs. 141 and 142), and shown in Fig. 139. (See Drawers in Part V.)
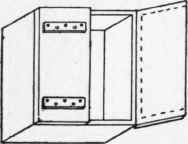
Fig. 137.

Fig. 138.
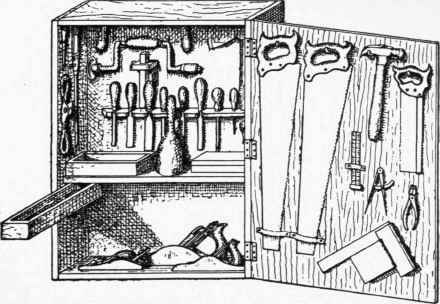
Fig. 139.
To fasten the doors you can hook one on the inside and put a button (which you can whittle out) on the outside to hold the other. If you wish to lock, hook one door inside and lock the other to it (see Locks). A padlock with staples and iron strap is easier to put on To make a cupboard of boards instead of using a box, you simply make a box yourself (see Box-making in Part II.) and then proceed as above.
Fig. 140 shows a good form of cabinet. Make a tight box, perhaps 2' x 3' x 6" to 9", the sides and ends of 7/8" stock, and the top and bottom (i. e., the front and back of the cabinet) of 1/2" stock. Saw it open carefully on the line a b c about 2" or 3" from the top or face, according to the thickness of the box, first marking the ends or the sides so that you can finally put them together again in the same positions. When nailing the box together omit all nails which could interfere with the sawing. They can easily be put in afterwards. (See Box-making, in Part II.) Carefully smooth the edges after the saw. Reckless and hasty planing will spoil the joint. Fit two strap-hinges, or three of the common kind. Fit up inside as you wish, and fasten with hasp, padlock, or a lock working on the principle of a chest lock.
All these cabinets must be firmly fastened to the wall, for they will be very heavy when filled. Do not trust to a couple of nails or screws, the way amateurs so often put up shelves and cabinets in the house. A ledge of some sort below is a great help (Fig. 140) to relieve the screws or nails of the weight. If the back is not very strong, do not trust wholly to it, but add cleats outside or inside. If in the house, stout screw-eyes of heavy wire in the sides of the cabinet, through which you can screw to the wall, are good (Fig. 140).
Good shelves can be made by arranging empty boxes one on top of another, or by taking a wide, thin (fiat) box and fitting shelves across it, like a bookcase, and then fastening the whole to the wall.
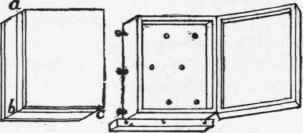
Fig. 140.
A small drawer can be fixed under a shelf, anywhere in your shop, on the principle often used in sewing-machine tables and the like, by taking a small box of suitable shape, strengthening one corner if necessary
(Fig. 141), and pivoting it with a screw at that corner(Fig. 142).

Fig. 141.
Fig. 142.
Continue to:
My Books

