Book Rack
Description
This section is from the book "Shop Projects Based On Community Problems", by Myron G. Burton. Also available from Amazon: Shop Projects Based on Community Problems.
Book Rack

Materials
Chestnut (Chap. III., Par.
35) or any hard wood.
1 pc. 5/8"x5 1/4"x28" Bottom and ends. S 2 S.
Introductory Statement
A small bookrack for use on a library or study table is very important in order to keep the books in shape for ready use. The length of the bookrack depends upon the number of books which it is intended to hold. The bookrack should be made of some kind of cabinet wood such as oak, walnut, cherry, mahogany or gum. It should be given a finish which will correspond with the finish of the furniture with which it is to be used. Innumerable designs have been worked out for bookracks, but you should try to put as much originality as you can in your piece of work. It is better to undertake a simple design and do it well than to attempt a difficult style and leave it showing marks of carelessness and inexperience.
References:
Handwork in Wood, Wm, Noyes. Manual Arts Press, Peoria, Ill. Essentials of Woodworking, Griffith. Manual Arts Press, Peoria, Ill. Instructions for Amateur Bookbinding. Craft Materials Guild, 119 La-
Salle St., Chicago. Harper's Indoor Book for Boys. Harper & Brothers, New York. Seasoning of Timber, Bulletin No. 41, N. Y., 1902.
Book Rack

Suggestions For Original Design

No. 1
No. 2

No. 3
No. 4
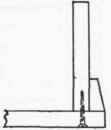
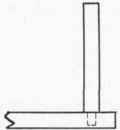
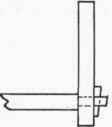
Various Methods Of Fastening Ends
Book Rack Specifications
The Base
The entire material for the book rack may be cut from one piece of stock, 5/8"x5 1/4"x28". Select the best side of the material and plane it perfectly smooth for the working face (Chapter II., Paragraph 2). Plane one edge for a working edge (Chapter II., Paragraph 4). Prepare a working end (Chapter II., Paragraph 5); with the marking gauge (Chapter II., Paragraph 6) or with ruler and pencil (Chapter II., Paragraph 7) gauge the width of the base on both surfaces.
Since the ends and base are to be exactly the same width, you may gauge the full length of the piece of material; carefully plane to these gauge lines. Measure the length for the ends; with the try-square, square across the working face, cutting off pieces the right length for the ends (Chapter II., Paragraph 5).
The Ends
If you do not expect to use the design given in the working drawing, make a drawing of your own. This drawing should first be made on paper. Lay out and shape one of the ends; use it for a pattern in laying out the other; make the two exactly alike.
Mortising
A wide mortise is to be cut in each end piece to receive the tenon on the end of the base (Chapter V., Paragraph 66). (Other methods of joining the ends and base are shown in the suggestions. Use one of these methods if you desire.)
Assembling
Assemble with glue and, if it seems necessary, two or three small brads may be driven through each end piece into the tenons (Chapter II., Paragraph 21). This, however, will not be required if the joints fit perfectly.
Finishing
All broad surfaces should be carefully gone over with the steel scraper (Chapter II., Paragraph 16). All surfaces should be carefully sandpapered. Use great precaution not to round any of the sharp corners (Chapter II., Paragraph 17). Stain the book rack the desired color (Chapter IV., Paragraph 54). If desirable the book rack may be given a coat of filler (Chapter IV., Paragraph 55). It may be finished with a wax polish (Chapter IV., Paragraph 56) or with shellac (Chapter IV., Paragraph 57).
Optional and Home Projects Employing Similar Principles.
Post Card Rack
1. In using this plan for making a post card rack the material should be somewhat thinner, perhaps 3/8" or even a little less. One of the fine cabinet woods should be used, such as walnut, cherry or mahogany. The base should be very much shorter than in a book rack; 4 or 5 inches would probably be long enough for an average-sized card rack.
Folding Book Rack
2. A very convenient folding book rack may be made by constructing a rectangular frame of the desired size for the base; this frame may be joined at the corners with the cross-lap joint; the end pieces should be made just wide enough to go inside the frame, and should be joined to it with a small piece of dowel rod, or a round head screw on each side. If these screws are properly placed the ends, when folded, will lie flat inside the rectangular frame, and when open will stand perpendicular, resting against the cross rails of the base frame.
Continue to:
My Books

