Flower Pot Stand
Description
This section is from the book "Shop Projects Based On Community Problems", by Myron G. Burton. Also available from Amazon: Shop Projects Based on Community Problems.
Flower Pot Stand

Materials
Yellow Pine (Chap. III.,
Par. 48) or any soft wood.
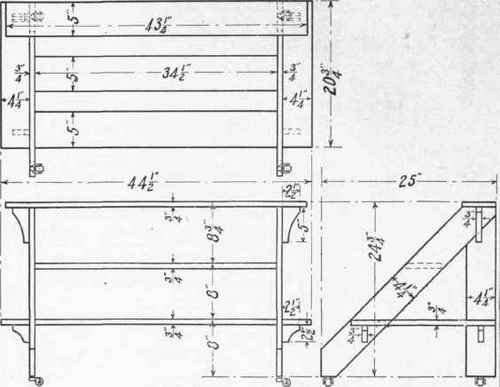
2 pcs. 7/8"x5l,4"x35" S 2 S Shelves.
1 pc. 7/8"x5l4"x44" S 2 S Top.
2 pcs. 7/8"x4l/2"x36" S 2 S Legs.
3 pes. 7/8"x4 1/2"x35 1/2" S 2 S Back shelf.
2 pcs. 7/8"x4 1/2"x24" S 2 S Legs.
2pcs. 7/8"x3"x5 1/2" S2S Brackets.
2 pes. 7/8"x2 1/2"x3" S2S Brack ets. 5 dozen 6d finishing nails. 4 small castors. 8- 1/2" corrugated nails.
Introductory Statement
Many homes are made more cheerful and beautiful by keeping a few pots of growing plants and flowers. Unless some special way is provided to care for them there is considerable inconvenience connected with the task.
The purpose of this flower pot stand is to provide a substantial and satisfactory stand upon which the flower pots may be placed where there will be no danger of their being knocked over. It will also give the flowers a chance to be seen and to be moved about conveniently.
This stand can be made any size to suit the room and the purpose for which it is intended. A very large stand would be suitable for outdoor or porch use, while a smaller and more neatly made one would be required for inside service. If the stand is placed on castors it will be found a great convenience in moving it from place to place for the purpose of sweeping or accommodating the plants to the sunlight.
References:
U. S. Bulletin No. 113, Experimental Gardens and Grounds. Garden Making, Bailey. The Macmillan Co., publishers. How to Know Wild Flowers, W. S. Dana. Chas. Scribner's Sons. Plants, J. M. Coulter. Appleton Pub. Co., New York.
Flower Pot Stand
Suggestions For Original Design
No. 1
No. 2
Flower Pot Stand Specifications
The Legs
As this material is furnished S 2 S it will not be necessary for you to plane the surface. Select the best side for a working face (Chapter II., Paragraph 2). Prepare a working edge (Chapter II., Paragraph 4). This angle for the legs is known as the half pitch cut (Chapter V., Paragraph 75). This cut should be laid out as explained in Chapter II., Paragraph 24. Cut all the legs the dimensions shown in the drawing.
The Shelves
It will not be necessary to resurface this material. Prepare a working edge (Chapter II., Paragraph 4) and a squared end
(Chapter II., Paragraph 5). Cut the material the width and length shown in the drawing. Make sure all the shelves are exactly the same length.
The Top
The top shelf should be long enough to project at each end, as shown in the drawing. Since the ends of the top piece will be exposed, they should be block planed (Chapter II., Paragraph 5), and finished with sandpaper.
The side shelves should also have the ends block planed and sandpapered.
The Brackets
Lay out one of the larger brackets the desired shape. (If you wish you may make an original design.) With the coping or compass saw, saw it out and with the wood file or block plane make all edges perfectly straight and square. Be sure that the angle of the bracket is a perfect right angle; test it with the square. Using this as a pattern, lay out and cut the other large bracket exactly like it.
In similar manner design and make the required number of small brackets.
Assembling
The front legs are to be joined to the rear legs with corrugated nails (Chapter II., Paragraph 23).
The shelves are to be fastened in position by nailing through the legs at each end of the shelf. Lay out and place the shelves carefully so they will stand parallel; nail them in position (Chapter II., Paragraph 21). The top is to be nailed down through into the legs. The side shelves may be toe-nailed (Chapter II., Paragraph 22).
Test with the square to make sure that all angles are perfect, then nail the brackets in position. If properly made and nailed, these brackets will brace the stand securely.
Bore the holes for the castors. The castors need not be put on until after the finishing is done; if they are put on before, care must be exercised not to get any stain on them.
Finishing
With a sharp steel scraper remove all pencil or tool marks and make sure that the surface is perfectly smooth. The nails may be driven slightly below the surface with a nail set. The holes can be filled with putty. Stain the desired color (Chapter IV., Paragraph 54). Finish with one or two coats of shellac (Chapter IV., Paragraph 57) or a coat of varnish (Chapter IV., Paragraph 58). Note: If the flower pot stand is to be used out of doors, one or two coats of paint (Chapter IV., Paragraph 52) will be preferable to the shellac or varnish, although a good coating of oil stain would stand considerable outside wear.
. Optional and Home Projects Employing Similar Principles.
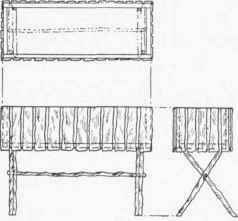
Rustic Flower Pot Stand
1. A rustic flower pot stand is particularly suitable for the porch or lawn. Suggestion No. 1 presents an idea for a combination stand and flower box. This idea may be modified in a great many ways which will suggest themselves when the work is undertaken.
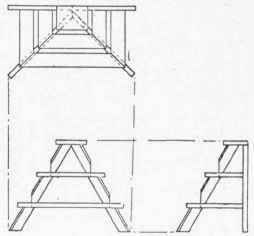
Pyramid Stand
2. The shape of a flower pot stand may be modified to suit one's personal taste. In suggestion No. 2 the idea of arranging the flowers in a pyramid is presented.
Continue to:
My Books

