Sleeve Board
Description
This section is from the book "Shop Projects Based On Community Problems", by Myron G. Burton. Also available from Amazon: Shop Projects Based on Community Problems.
Sleeve Board

Materials
Yellow Pine (Chap. III.,
Par. 48) or any soft wood.
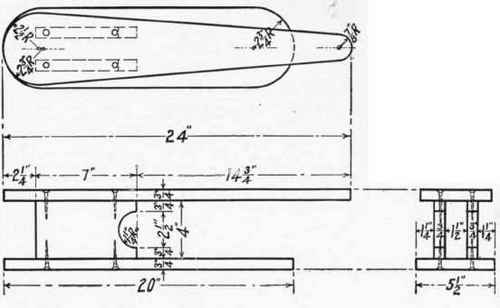
1 pc. 7/8"x5 "x24" S 2 S Top.
1 pc. 7/8"x5 3/4"x20" S 2 S Base.
2 pcs. 7/8"x4 "x 7" S 2 S Blocks.
8-l 1/2" No. 10 F. H. B. screws.
Introductory Statement
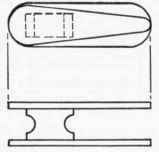
This sleeve board offers a solution to the problem of pressing the sleeve of a garment without causing a crease. Some housekeepers consider a sleeve board a very important piece of equipment. It can be used in a number of ways in ironing and pressing. The pressing board may be covered with heavy muslin or whatever padding the user may desire.
References:
Educational Woodworking for Home and School, Park. Macmillan Co., New York.
Training in Woodwork, Tate. Northwestern School Supply Co., Minneapolis, Minn.
American Boy's Workshop, Kelland. Book Supply Co., Chicago.
U. S. Bulletin No. 173, A Primer of Forestry.
Sleeve Board
Suggestions For Original Design
No.1

N0.2-Large Ironing Board
Sleeve Board Specifications
The Top
Although this material is furnished S 2 S you should plane the surface with a sharp plane set to take a very thin shaving. Select the best surface for a working face (Chapter II., Paragraph 2). Plane one edge perfectly straight and square for a working edge (Chapter II., Paragraph 4). Prepare a working end (Chapter II., Paragraph 5); lay out and cut length of the top piece, as shown in the drawing. With the compasses set to the proper radius (shown in the drawing) lay out the shape of the top. With the compass saw cut the curves and with a rip saw finish sawing out the top. Carefully plane all the edges and make sure they are perfectly square with the working face. The round ends may be finished with a wood file.
The Base
Select the best surface for the working face (Chapter II., Paragraph 2). Prepare a working edge (Chapter II., Paragraph 4). Lay out and cut the base the shape and dimensions shown in the drawing. Make sure that the edges are planed perfectly square; finish the ends with a wood file and sandpaper.
The Blocks
Select the best surface for a working face (Chapter II., Paragraph 2). Prepare a working edge (Chapter II., Paragraph 4). Cut the two blocks rectangular, the size shown in the drawing; with the compasses lay out the curve on one of the blocks (without changing the radius of the compasses); lay out the curve on the other block in the same manner. With the compass saw, saw out the curve in each block. Compare the blocks to make sure they are exactly the same size.
Assembling
This piece of work is to be assembled with screws. Be sure to bore the holes in the top and the base large enough to allow the screws to pass through freely (Chapter II., Paragraph 9). Countersink the holes so the screw heads will be slightly below the surface when they are driven in. In assembling this piece of work be very careful to have the top board stand exactly straight over the center of the base board.
Finishing
With a sharp steel scraper (Chapter II., Paragraph 16) remove all pencil or tool marks from all parts of the work. Smooth perfectly with a clean piece of fine sandpaper (Chapter II., Paragraph 17). Give the work one or two coats of shellac (Chapter IV., Paragraph 57). Shellac the bottom of the base, the under side of the top and the inside of the blocks; these parts may not show, but shellacing them will prevent warping.
Optional and Home Projects Employing Similar Principles.
Simple Pressing Board
1. A simple pressing board to be used on the table can be very easily made of almost any kind of lumber. If two or more pieces are needed to make the required width, their edges should be neatly joined. Two or three battens should be attached with screws on the bottom side; a heavy piece of asbestos or a suitable metal stand for the iron might be fastened on the top side. The board should be covered with some suitable material.
Folding Ironing Board
2. Suggestion No. 2 presents an idea for a folding ironing board; this board is hinged to one pair of legs, leaving it free to raise at the pointed end. The notched strip across the bottom makes it possible to adjust the height and also to close it completely.
Continue to:
My Books

