Chapter II. First Year Models (Wood). Ruler, Flower-Stick, And Key Rack (Fig. 1)
Description
This section is from the book "Handcraft In Wood And Metal", by John Hooper, Alfred J. Shirley. Also available from Amazon: Handcraft In Wood And Metal.
Chapter II. First Year Models (Wood). Ruler, Flower-Stick, And Key Rack (Fig. 1)
Object
Models designed chiefly to introduce exercises in planing and sawing.
The Process
Round Ruler.-For class work, one piece of wood 12 x 7/8 in. square should be issued to each student. A finely set jack plane should be used for the planing process.
1. Plane up face side and edge. ia. Pencil face marks on material (straight edge to be employed for testing the above planing).
2. Set marking gauge, and gauge the material for width and thickness.
3. Set out octagon on each end, as per diagram (second step).
4. Plane to octagonal shape (see diagram, second stage).
5. With smoothing plane complete the planing to circular section.
6. Finish with glass paper and saw off ends to finished length.
Flower Stick
1. Plane to width and thickness one piece yellow deal, 15 x 3/4 x 1/4 in.
2. Set out pointed end, also semicircular top.
3. Saw bottom and corners off top, compare latter by paring.
4. Execute notches by cutting with firmer chisel.
Key Rack
1. Prepare one piece of American whitewood, 10 1/2 x 2 1/4 x 1/2 in. = 26 x 6 x 1.2 cm.
2. Plane up face, side, and edge. 2a. Plane and gauge to width and thickness.
3. Mark out the semicircular ends. 3a. Cut same with dovetail saw (see Fig. 1).
4. Pare down to lines with firmer chisel. 4a. Prepare a specimen of chamfering.
5. Set out and execute chamfering on key rack with file.
Note
In the second and third examples dealt with above, chamfering is employed as the simplest kind of ornament, and permits of individual effort in designing same. For class work an extra piece of wood can be issued and the pupils encouraged to suggest treatments, limiting them to the use of a file and small chisel. A demonstration showing one or two different types should precede their efforts. The hooks can be placed vertically as shown or horizontal for large keys, when the rack is, of course, also fixed in a horizontal position.
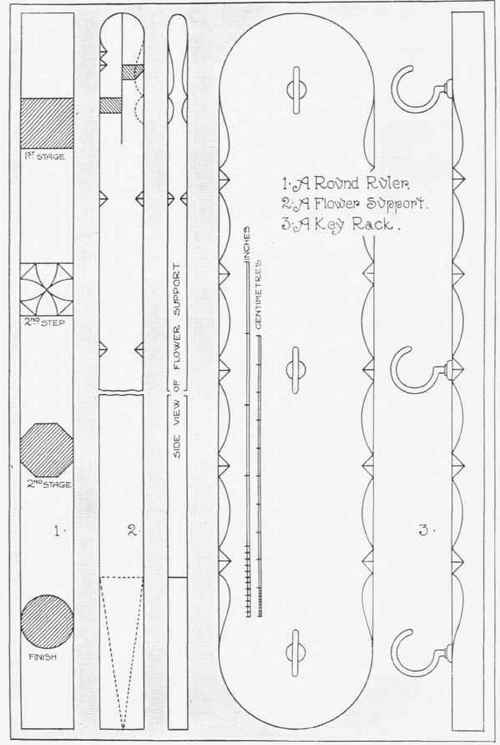
Fig. 1.
Continue to:
My Books

