Chapter XXVII. Wash-Hand Basins
Description
This section is from the book "Plumbing Practice", by J. Wright Clarke. Also available from Amazon: Modern plumbing practice.
Chapter XXVII. Wash-Hand Basins
Wash-hand basins are a great convenience in a home, but they, as a rule, have less thought bestowed on their arrangement than any other sanitary fitting. Very few basins are made as they should be. Figure 267 shows an ordinary basin, with the rim drooping, so that when it is used any water that may get into the space between the basin and slab will run outward and rot or injure the woodwork. To obviate this, the under side of the marble, or other material that may be used, should be hollowed, and the rim of the basin made to curl upward, as shown in section, Figure 268, so that any water that may get into the joint will run back into the basin, and the joint should be made as close as possible so as not to have an unsightly and dirty appearance. Figure 267 shows the marble top cut so that any water that may run off the top must fall on the rim of the basin. Figure 268 shows the top slightly oversaving the basin so as to form a kind of dripping-eave for the water to drop into the basin. When marble is used as the top for a wash-hand basin, plaster-of-paris is used for bedding it. This will not stand being wetted, but soon breaks away. Putty, or any oil cement, cannot be used for this purpose, as it discolours the marble. Sometimes the wooden carriage for the basin is not used, but the basin is let into the marble or slate top, as shown in section, Figure 269. This is a bad arrangement, as any water splashed on the top cannot get back into the basin, or, should the rebate be cut deep enough so that the basin does not stand up so high, as shown, a dirty and unsightly joint is seen. When arranged in this way a new basin can easily be fixed in case of breakage, but, for appearance, it is not equal to Figure 268. For fixing near the garden entrance or gun-room of a mansion, or in the kitchen for cook's use, a basin 12 or 14 inches in diameter is quite large enough, but for toilet purposes it should never be less than 18 or 20 inches in diameter. Some people are partial to fancy-painted and coloured basins, but I prefer a plain white or cream tint. A plain gold line is a relief, but adds to the cost of the basin. Anything that tends to disguise dirt should be avoided, so the plain basins are the best. Figure 270 is a view of a bowl and top manufactured in one piece of earthenware. The bowl is made oval-shaped, and is sometimes called the elbow-room basin. This shape has an advantage over the round one as being more convenient for the user. Figures 271, 272, and 273, are illustrations of other shapes of cabinet-stand wash-hand basins. Some have skirtings, but when
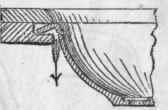
Figure 267.
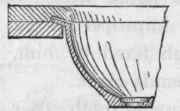
Figure 268.
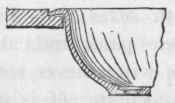
Figure 269.
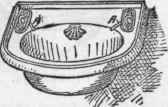
Figure 270.
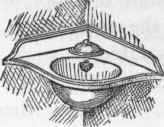
Figure 271.
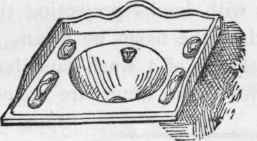
Figure 272.
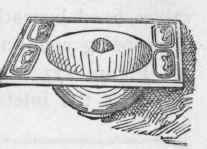
Figure 273.
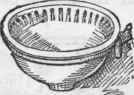
Figure 274.
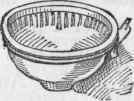
Figure 275.
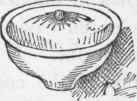
Figure 276.

Figure 277.
For simplicity and moderate cost, a standard valve as described for baths, Figure 241, is very good. The nozzle should project about 1/4-inch inside the basin, so that should it leak it will drip into the basin clear of the marble, so as not to have the water drawn into the joint by capillary attraction. All cocks of this kind (in fact, bibb-cocks or faucets generally) retain a nozzle full of water when shut off, which will sometimes hang up for hours until it has dripped empty, and this occurs more when the nozzle of the cock is bent downward. This has sometimes led to the plumber being sent for to repair the valve, under the impression it was leaking. With a great many people a self-closing supply-valve is preferred, as the water cannot be left running so as to overflow the basin. Figure 279 is a good description. It is known as a "cam-action" valve. By pulling the top, E, forward, the thus rendering it perfectly useless. The air pipe should be fixed near the bottom end of the overflow pipe; if fixed near the top end any syphonic action would be prevented, but if fixed too low the water in the trap would seal the bottom end and prevent the air from escaping. The sketch, Figure 280, will explain what is meant. It makes no difference if the overflow pipe is connected to the trap above or below the water-line, as in each case the air cannot escape. Sometimes wash-hand basins are made so that one shell will cover both the outlet and overflow-arms, but when this is done there is generally some difficulty in getting the overflow to take away the water as fast as it should. The reader is referred to what was before said about the overflow being fixed beneath the cock-nozzles for the reason.

Figure 278.
"cam" at the bottom presses down the spindle of the valve and allows the water to pass through. If the valve has a flanged connection at the top, half can be taken off, and any repairs made without taking out the rest of the valve. The nozzle should be bent as shown, so that the incoming water plays into the centre of the basin. If the nozzle is bent downward, as shown by dotted lines, the water will strike on the side of the basin, rush around the bottom and over the opposite side on to the dress of the person using it. When valves of this description are used they should be fixed on the back side of the basin, and some few inches away, so that when stooping to wash the face the head may not come into unpleasant contact with the knobs. When fixed at the sides the elbows of the user sometimes get injured.
All wash-hand basins should have good large overflows to them so as to take away the water as fast as it can come in. As a matter of fact, very few will do this. Even when they are a good size the mistake is generally made of fixing them immediately beneath the nozzles of the cocks, when the rush of the incoming water creates a depression or vortex, and prevents the overflow from being of any use. When holes in the sides of the basin are used for the overflow, the arm and overflow pipe will act as a syphon and draw the water away very fast, but air is also drawn in through the upper series of holes. A shell made to fit over the overflow orifice will prevent air entering, so that the water is drawn away more rapidly. The overflow pipe should be carried into the trap of the waste pipe, unless a safe is fixed on the floor, when the overflow can be made to discharge into the waste pipe from it. When the overflow is connected to the trap of the wash-hand basin waste, and a shell is fixed over the orifice in the basin, it is necessary to fix a vent pipe. Without this, the air in the overflow pipe would be pent up so as to be "air-bound,"
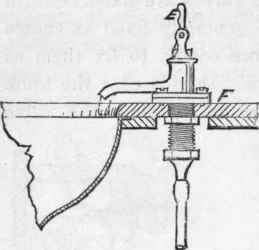
Figure 279.
Some Water Companies insist that self-closing supply-cocks should be used, and no overflow fixed; or, if one, that it should be carried through the wall so as to discharge in a conspicuous position.
There are wash-hand basins with the overflow provision made in the earthenware. Figure 281 shows in section how this is arranged, and Figure 282 is the specially-made waste-plug and washer drawn to a larger scale. These basins can only be fitted with a plug-waste. If a valve or apparatus were used for emptying the basin the above overflow provision would be useless.
The waste-holes of wash-hand basins are generally made too small, so that a very small plug has to be used, with the result that the basin takes a long time to empty of its contents. Figure 283 represents a wash-hand basin that had to be altered because of the unpleasant smells arising from it. The owner complained that it had been altered several times, but the evil still remained. The smells could not be accounted for, because the waste pipe was cut off, as shown at C, so that the end of it was open to the air. It appeared as if the overflow pipe had originally been connected to the trap, as shown at A, the stump-end having been left in and the end soldered over. The overflow had been altered and soldered into the waste pipe at B. The trap was a medium-size D-trap, about 8 inches deep. The waste pipe was 2-inch lead pipe. The plug was 3/4-inch in diameter. The trap being fixed under the floor, there was about 2 feet of the 2-inch pipe very foul inside from the soapy matter, and every time the basin was used the air in this pipe was displaced and driven through the overflow pipe. Here was a host of mistakes made by the man who fixed it. The hole in the basin was of such a size that a small washer and plug had to be used. The waste pipe was too large, the D-trap was too large and fixed too far away from the basin. The brass screw-cap was in an inaccessible position. Figure 284 is a sketch showing the new basin and how it was fitted up with trap, etc. The water-way through the washer, trap, and waste pipe, was of the same diameter throughout. The trap vent pipe, E, was continued upward as high as the top of the basin; if this was not done the escaping air would sometimes bring a few drops of water with it. When open heads are used for waste pipes to discharge into, the pipe should be carried down to the bottom, as shown at G, Figure 284. This is to prevent the waste water being splashed over a large surface on the inside of the head, which would soon give off offensive smells. In several cases where these hopper heads have been used for two or three waste pipes to discharge into, the smells have been so objectionable that air-tight coverings have been fixed and ventilation pipes carried up to a higher level.

Figure 280.

Figure 281.
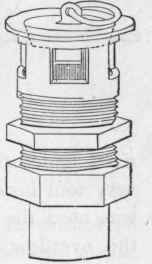
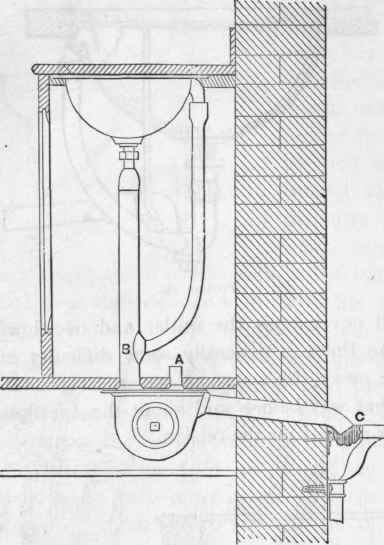
Figure 283.

Figure 284.
Continue to:
My Books

