Lingerie Dress
Description
This section is from the book "School Sewing Based On Home Problems", by Ida Robinson Burton, Myron G. Burton. Also available from Amazon: School Sewing Based On Home Problems.
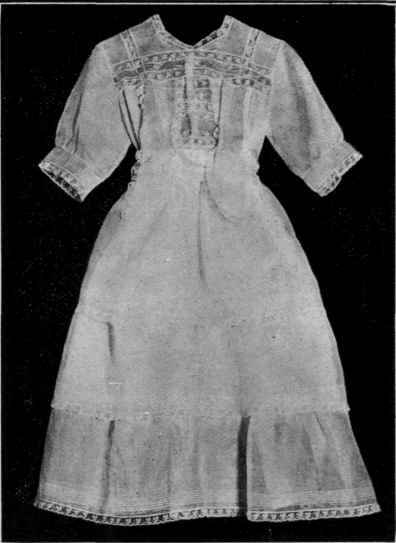
Lingerie Dress
Materials
Organdie (Chap. I, Par. 29) or
Lawn (Chap. I, Par. 23) or
Handkerchief Linen (Chap. I, Par. 46).
Amount of material called for in commercial pattern.
Suitable trimming for style selected.
Belting 2" longer than waist line.
Thread No. 90.
Introductory Statement
The long hot days of summer afford an opportunity for a girl to wear pretty lingerie dresses made of the exquisite organdies, Swisses, mulls, dimities, voiles, and lawns which are so universally becoming. If a girl is able to make her own dresses and has the time to do it, she can have a variety, for very pretty ones can be made with small cost if there are no dressmaker's bills to pay.
The tall, slender girl may make an attractive appearance when thin summer dresses are in vogue, for the ruffles used so much in trimming them will appear to lessen her height and thus give her a better proportioned figure. The girl who is inclined to be short and stout should select materials with stripes and make them up length-wise (up and down), avoiding ruffles or trimming with stripes running around. She should also avoid any sort of striking girdle.
The dress in this lesson is planned to bring in as many as possible of the special features necessary in the making of any lace trimmed, thin dress. Notice that this dress is designed for a tall, slender girl.
References:
Beauty in Dress, Oakey.
Lessons in Garment Drafting, Gingles. Seemann & Peters, Saginaw.
Working Directions For Lingerie Dress
Preparing Material
Many people object to shrinking fine organdie, because it takes off a little of the new look. If you do not shrink it, you should make allowance for lengthening the skirt and waist after the dress is laundered.
Selecting The Pattern
Before making a dress similar to the one shown in this lesson, you should have had considerable experience in making plainer dresses; if you have not, select a less elaborate style for your dress. Use a commercial pattern.
Cutting Out The Dress
Study carefully the guide chart and directions accompanying the pattern; cut out the dress according to directions. NOTE: In making this dress you should be very careful to keep the table and machine carefully dusted so you will not have to launder the dress as soon as it is finished. Wear a white apron and keep your hands scrupulously clean.
The Seams
The parts of the waist in a dress of this character should be joined with very tiny French seams. As the skirts are usually gathered, or pleated, they also should be joined with tiny French seams.
To Set In Lace Insertion
Lace insertion in a waist similar to the one in the lesson should be set in before the seams are joined. To do this, baste the lace insertion on the waist in the desired position, mitering the corners where necessary. Stitch it on both edges. Cut out the material under the insertion leaving about 1/4" of the cloth extending under the insertion; fold this back and stitch it in place, or after it is folded back, sew it into a tiny roll with tightly drawn overcasting stitches. Buttonhole the mitered corners.
Handmade lace should be sewed in place by hand with fine running stitches and the under side finished as suggested above.
Tucks
The tucks used on a dress of this character should be very dainty; they are usually called pin tucks; the finer they are made the prettier the appearance. They may be made with the tucker on the sewing machine. Before trying to use the tucker, study the directions given in the book which accompanies the sewing machine and practice making the tucks on a small piece of cloth.
Tucks which end in the body of the material will have loose ends of thread. These threads should be drawn through to the wrong side and tied in a hard knot; the extra thread may be cut off.
Tucks in the cuff or sleeve are usually made before joining the seams. Care should be taken to have them evenly spaced and even in width where they are to be joined. The tucks in the ruffle of the skirt are usually put in after the ruffle is joined.
Tucks are sometimes made by hand with fine running stitches. They look attractive, but it requires a long time to make them.
Fitting The Dress
After the seams are basted, the garment should be tried on and fitted according to directions in Chap. IV.
Sleeves
Set-in sleeves may be sewed into the armhole with plain over-cast or French seams. Machine hemstitching is a very dainty way to set them in; seam beading gives much the same appearance as the hemstitching. Set it in with tiny French seams, or plain overcast seams.
Joining The Waist And Skirt
As this style of dress is usually finished at the waist line with a girdle of ribbon or silk, it may be joined in the following manner: Fit the belting to the waist, turn back and stitch the ends and sew on as many hooks and eyes as necessary to keep it from gaping (use the round eyes and let the eyes extend over the end of the belt, as directed in Chap. II, Par. 133.) Hook the belt around the waist, put on the waist, adjust the gathers at the waist line, and pin it to the top of the belting. Put on the skirt and pin the top of it to the lower edge of the belting. Remove the dress, baste and stitch the waist and skirt to the belting; cover the raw edges by hemming a strip of material over them.
NOTE: When the skirt and the waist do not open at the same place, have the belt open with the one most convenient. If part of the waist, or part of the skirt cannot be fastened to the belting, it should be faced or finished with a separate band, and held in its proper place with hooks and eyes, or snaps.
The girdle may be made separate, or may be fastened to the dress. If it is fastened to the dress it is not necessary to cover the raw edges of the waist and skirt on the belting with the strip of material suggested above. If the dress is to be finished without a girdle, hook the belting around the waist, adjust the fullness at the waist line and pin it to the top of the belting; cut off the extra material. Pin the skirt to the bottom of the belting in a few places, turn in the top edge, place it over the gathers in the waist and pin it in place with the edge a trifle above the top edge of the belting. Remove the dress, baste and stitch in place.
Bottom Of The Skirt
When the bottom of the skirt is to be finished with a ruffle, even the skirt around the bottom the distance from the floor necessary to make it the right length when the ruffle is sewed on. If more than one ruffle is to be placed on the skirt, sew on the bottom ruffle with a felled seam; lay the skirt on an ironing board or table and pin the second ruffle so the bottom edge will overlap the top and will be parallel with the bottom of the first ruffle. Continue in this manner until all the ruffles are sewed on. If the top of the upper ruffle is not concealed at the waist line, the raw edges should be turned in and the edge finished with a small heading, which may be used as a finish for the top of the ruffle when it is sewed on the skirt.
The lace on the edge of the ruffles should be sewed on by hand, but it may be stitched flat on the edge with the machine. The lace trimming on the waist should be sewed on by hand.
Fastenings
A lingerie dress may be fastened together with tiny buttons and buttonholes, or small snaps with hooks and eyes at the belt.
The Girdle
As each season brings its new fads for girdles and sashes, no attempt is made here to give directions for making a girdle. Patterns may be obtained with directions for making. One girdle or sash may be used for several dresses.
Continue to:
My Books

