Bench Hook
Description
This section is from the book "Shop Projects Based On Community Problems", by Myron G. Burton. Also available from Amazon: Shop Projects Based on Community Problems.
Bench Hook

Materials
Yellow Pine (Chap. III., Par. 48) or any soft wood.
1 pc. 7/8"x4 3/4"x19" S 2 S Base and blocks. 4-1 1/2" No. 10 F. H. B. screws.
Introductory Statement
While most work benches are provided with a vise in which to hold small pieces of material, yet a bench hook provides a very satisfactory means of holding small pieces of sawing in the absence of a vise; it also serves a great many purposes for which a vise cannot be used.
The bench hook should be kept hanging either on the leg of the bench or in some other convenient place, where it can always be had when needed. The proper use of a bench hook will prevent sawing the bench top or marring it with the chisel, for this bench hook is made wide enough to provide a good surface on which to do chiseling.
The bench hook shown in this lesson provides the sawing space on the right-hand side. If the hook is to be used by a left-handed person, the block should be set on in such a way as to leave the sawing margin on the left-hand side of the bench hook. A bench hook could be made with one right and one left-hand side.
References:
The Amateur Mechanic's Workshop. G. P. Putnam's Sons. Elementary Woodworking, Edwin Foster. Ginn & Co. The Handy Boy, A. Neely Hall. Lathrop, Lee & Shepard Co. The First Book of Forestry, Ernest Thompson Seton. Doubleday, Page & Co.
Bench Hook

Suggestions For Original Design
No.1
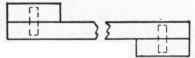
Detail Shotting Dowel Connection
No.2
Bench Hook Specifications
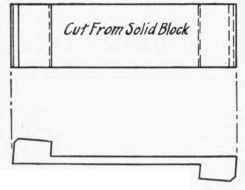
The Base
If your material is furnished S 2 S (surfaced on two sides) it will not be necessary for you to plane the surface. Select one surface for the working face (Chapter II., Paragraph 2); plane one edge perfectly straight and square with the working face. Mark it the working edge (Chapter II., Paragraph 4). Plane one end perfectly straight and square with the working face and the working edge. Mark this the working end (Chapter II., Paragraph 5). Measure the length (14") from the working end; at this point square a line on the working face, square it around, and plane the end (Chapter II., Paragraph 5).
(Note: - The remaining material is to make the two blocks.)
Gauge the width 4 1/2" on both surfaces (Chapter II., Paragraph 6); plane to the gauge line; leave all corners square and sharp.
The Blocks
The two blocks are to be just alike (2 1/4"x4"). From the working edge gauge the width of one of the blocks (Chapter II., Paragraph 6); from the other edge gauge another line on the same surface. Fasten the material in the vise, and with a ripsaw rip between the two gauge lines. Plane to the gauge line on each block. With the try-square, carefully test each block on all edges and all corners; make them perfectly square.
Assembling
This is to be assembled with glue and screws (or with dowels if you care to follow the idea given in the Suggestions for Original Designs No. 2). If you use screws, bore through the block with a bit large enough to allow the screws to pass through (Chapter II., Paragraph 9). Countersink these holes so the heads of the screws will be slightly below the surface of the block. Hold the blocks (one at a time) in their proper positions, and with a brad awl, reaching through the holes, in each block indicate on the base where to bore for the screws. With a brad awl, or a small bit, make holes in which to start the screws. Spread a thin, even coating of glue on the side of the block which is to join the base. Fasten the blocks in place with screws. When the screws are tight they should stand with their slots in the same direction. It is a general principle of mechanics that wherever screws show the slots should stand in line.
Finishing
When the work is assembled, clean it with sandpaper, making sure to remove any surplus glue that may have spread out of the edges of the joints. It may be necessary to plane the outside edges of the joints to make them perfectly even. Bore the 1/4" hanging hole, as indicated in the drawing (Chapter II., Paragraph 9). Finish with shellac (Chapter IV., Paragraph 57). This bench hook is a very serviceable article and should be used on your bench for sawing or chiseling purposes.
Optional and Home Projects Employing Similar Principles.
Walking Stilts
1. The principle of planing material straight and square, and of assembling with screws may be employed in a great many different articles about the home. For exercise and amusement it may be applied to the making of stilts. Plane two strong strips of any kind of sound material straight and smooth. They may be made as long as desirable, but should not be made too high for first experience. Prepare two triangular blocks by first making a rectangular block about four by eight inches, then sawing it diagonally. Fasten these blocks to the uprights (at the same height) with screws through the uprights into the blocks. A piece of strap iron or leather may be used to form a loop to help hold the foot in place.
Swing Board
2. After planing a board straight and square, it may easily be made into a swing board by providing notches for the rope. These notches can be best prepared by boring a hole very close to each end (perhaps within 1" or I 1/2" of the end) and sawing out a sort of "V" shaped notch to the hole.
Continue to:
My Books

